Configuring LDAP based authentication in RHEL7

WHat is LDAP?

LDAP: Light weight Directory Access Protocol

This authentication will allow client machine to access any centralized   data/service from different places.

Keeping services/data centralized is very simple to maintain and Grant/Deny permission centrally.


Installing Openldap:

[root@server ~]# yum -y install openldap*


Make sure that SELinux should not deny LDAP. So for that we have to enable the below Boolean values in both server and client.

[root@server ~]# setsebool -P allow_ypbind=0 authlogin_nsswitch_use_ldap=0

Now enable ldap permanently in this session and start the ldap service

[root@server ~]# systemctl enable slapd
[root@server ~]# systemctl start slapd

Since ldap service is running ldap user should be the owner for /var/lib/ldap directory. By default this will be modified by root user as its administrator.
So, we have to change owner and group as ldap user. Before that make a copy of configuration file for slapd into /var/lib/ldap with the DB_CONFIG name.

Note: slapd configuration file will be available under /usr/share/openldap-servers/DB_CONFIG.example


[root@server ~]# cp /usr/share/openldap-servers/DB_CONFIG.example /var/lib/ldap/DB_CONFIG
cp: overwrite ‘/var/lib/ldap/DB_CONFIG’? y

Now change the owenr as ldap user recursively to that directory.


[root@server ~]# chown -R ldap:ldap /var/lib/ldap


Now set password for ldap admin use and take a copy of create password for future use.

[root@server ~]# slappasswd
New password:
Re-enter new password:
{SSHA}Kp/mCASZRf/dBKNHKOxg4O5lEt7vyiRB


LDAP configuration files are available under /etc/openldap/slapd.d/.
We need to update the “olcSuffix” and “olcRootDN” varialbles.

olcSuffix: Its domain for the LDAP Server to provided the information.
olcRootDN: This is administrator user entry who has all the permission to do operation like root (Root Distinguished Name)

olcRootPW: Password of above user.


Above entries should be updated in /etc/openldap/slapd.d/cn=config/olcDatabase={2}hdb.ldif file.
Note: Updating the entries manually is nont adviseable. So, we are going to create a ldif file and update it using ldapmodify command.


Now creare ldaprootpasswd.ldif file with following contents:

[root@server cn=config]# vi db.ldif

dn: olcDatabase={2}hdb,cn=config
changetype: modify
replace: olcSuffix
olcSuffix: dc=lbcdomain,dc=com

dn: olcDatabase={2}hdb,cn=config
changetype: modify
replace: olcRootDN
olcRootDN: cn=ldapadm,dc=lbcdomain,dc=com

dn: olcDatabase={2}hdb,cn=config
changetype: modify
replace: olcRootPW
olcRootPW: {SSHA}Kp/mCASZRf/dBKNHKOxg4O5lEt7vyiRB

save and exit.

once file created with above content execute the below command

[root@server cn=config]# ldapmodify -Y EXTERNAL -H ldapi:/// -f db.ldif
SASL/EXTERNAL authentication started
SASL username: gidNumber=0+uidNumber=0,cn=peercred,cn=external,cn=auth
SASL SSF: 0
modifying entry "olcDatabase={2}hdb,cn=config"

modifying entry "olcDatabase={2}hdb,cn=config"

modifying entry "olcDatabase={2}hdb,cn=config"

[root@server cn=config]#


Do changes in /etc/openldap/slapd.d/cn=config/olcDatabase={1}monitor.ldif file to restrict monitor access to only ldap root user.


[root@server ~]# vi monitor.ldif

dn: olcDatabase={1}monitor,cn=config
changetype: modify
replace: olcAccess
olcAccess: {0}to * by dn.base="gidNumber=0+uidNumber=0,cn=peercred,cn=external, cn=auth" read by dn.base="cn=ldapadm,dc=lbcdomain,dc=com" read by * none


save and exit from the file.

once created file with above content send configuration to ldap server by usinf ldapmodify command.


[root@server cn=config]# ldapmodify -Y EXTERNAL -H ldapi:/// -f monitor.ldif
SASL/EXTERNAL authentication started
SASL username: gidNumber=0+uidNumber=0,cn=peercred,cn=external,cn=auth
SASL SSF: 0
modifying entry "olcDatabase={1}monitor,cn=config"

[root@server cn=config]#


Creating LDAP Certificate:

now will create certifiate and private key with ldap server self signed by using below command in /etc/openldap/certs/ directory

[root@server cn=config]# openssl req -new -x509 -nodes -out /etc/openldap/certs/lbcdomainldapcert.pem -keyout /etc/openldap/certs/lbcdomainldapkey.pem -days 365
Generating a 2048 bit RSA private key
..........................................................................................................................................................................................................................+++
................+++
writing new private key to '/etc/openldap/certs/lbcdomainldapkey.pem'
-----
You are about to be asked to enter information that will be incorporated
into your certificate request.
What you are about to enter is what is called a Distinguished Name or a DN.
There are quite a few fields but you can leave some blank
For some fields there will be a default value,
If you enter '.', the field will be left blank.
-----
Country Name (2 letter code) [XX]:IN
State or Province Name (full name) []:Tamilnadu
Locality Name (eg, city) [Default City]:Chennai
Organization Name (eg, company) [Default Company Ltd]:Linux Book Center
Organizational Unit Name (eg, section) []:Linux Book Center
Common Name (eg, your name or your server's hostname) []:Server
Email Address []:[email protected]


Now change the ownership and group to key files.

[root@server cn=config]# chown -R ldap:ldap /etc/openldap/certs/*.pem

[root@server certs]# ll | grep pem
-rw-r--r--. 1 ldap ldap 1480 Aug 15 11:32 lbcdomainldapcert.pem
-rw-r--r--. 1 ldap ldap 1708 Aug 15 11:32 lbcdomainldapkey.pem


Create certs.ldif file to configure LDAP to use secure communication using self signed certificates.

[root@server certs]# vi certs.ldif

dn: cn=config
changetype: modify
replace: olcTLSCertificateFile
olcTLSCertificateFile: /etc/openldap/certs/lbcdomainldapcert.pem

dn: cn=config
changetype: modify
replace: olcTLSCertificateKeyFile
olcTLSCertificateKeyFile: /etc/openldap/certs/lbcdomainldapkey.pem

oncefile created import the certificate configuration by usging below ldapmodify command

[root@server certs]# ldapmodify -Y EXTERNAL -H ldapi:/// -f certs.ldif
SASL/EXTERNAL authentication started
SASL username: gidNumber=0+uidNumber=0,cn=peercred,cn=external,cn=auth
SASL SSF: 0
modifying entry "cn=config"

modifying entry "cn=config"

[root@server certs]#


Use the below command to verify the configuration:

[root@server certs]# slaptest -u
5992a281 UNKNOWN attributeDescription "CHANGETYPE" inserted.
5992a281 UNKNOWN attributeDescription "REPLACE" inserted.
5992a281 is_entry_objectclass("olcDatabase={2}hdb,cn=config,cn=config", "2.16.840.1.113730.3.2.6") no objectClass attribute
5992a281 is_entry_objectclass("olcDatabase={1}monitor,cn=config,cn=config", "2.16.840.1.113730.3.2.6") no objectClass attribute
config file testing succeeded

LDAP Database creation:

Sample configuration file will be available in /var/lib/ldap  file. Copy the sample file and change the file permission.

[root@server certs]# cp /usr/share/openldap-servers/DB_CONFIG.example /var/lib/ldap/DB_CONFIG
[root@server certs]# chown ldap:ldap /var/lib/ldap/*

Add cosine ans nis LDAP schemas

ldapadd -Y EXTERNAL -H ldapi:/// -f /etc/openldap/schema/cosine.ldif
ldapadd -Y EXTERNAL -H ldapi:/// -f /etc/openldap/schema/nis.ldif
ldapadd -Y EXTERNAL -H ldapi:/// -f /etc/openldap/schema/inetorgperson.ldif


[root@server certs]# ldapadd -Y EXTERNAL -H ldapi:/// -f /etc/openldap/schema/cosine.ldif
SASL/EXTERNAL authentication started
SASL username: gidNumber=0+uidNumber=0,cn=peercred,cn=external,cn=auth
SASL SSF: 0
adding new entry "cn=cosine,cn=schema,cn=config"
ldap_add: Other (e.g., implementation specific) error (80)
 additional info: olcAttributeTypes: Duplicate attributeType: "0.9.2342.19200300.100.1.2"


[root@server certs]# ldapadd -Y EXTERNAL -H ldapi:/// -f /etc/openldap/schema/nis.ldif
SASL/EXTERNAL authentication started
SASL username: gidNumber=0+uidNumber=0,cn=peercred,cn=external,cn=auth
SASL SSF: 0
adding new entry "cn=nis,cn=schema,cn=config"
ldap_add: Other (e.g., implementation specific) error (80)
 additional info: olcAttributeTypes: Duplicate attributeType: "1.3.6.1.1.1.1.2"
[root@server certs]# ldapadd -Y EXTERNAL -H ldapi:/// -f /etc/openldap/schema/inetorgperson.ldif
SASL/EXTERNAL authentication started
SASL username: gidNumber=0+uidNumber=0,cn=peercred,cn=external,cn=auth
SASL SSF: 0
adding new entry "cn=inetorgperson,cn=schema,cn=config"
ldap_add: Other (e.g., implementation specific) error (80)
 additional info: olcAttributeTypes: Duplicate attributeType: "2.16.840.1.113730.3.1.1"


Now create ldif file for our domain

[root@server certs]# vi base.ldif

dn: dc=lbcdomain,dc=com
dc: lbcdomain
objectClass: top
objectClass: domain

dn: cn=ldapadm ,dc=lbcdomain,dc=com
objectClass: organizationalRole
cn: ldapadm
description: LDAP Manager

dn: ou=People,dc=lbcdomain,dc=com
objectClass: organizationalUnit
ou: People

dn: ou=Group,dc=lbcdomain,dc=com
objectClass: organizationalUnit
ou: Group

Now build the directory structure

[root@server certs]# ldapadd -x -W -D "cn=ldapadm,dc=lbcdomain,dc=com" -f base.ldif
Enter LDAP Password:
adding new entry "dc=lbcdomain,dc=com"
ldap_add: Already exists (68)


We configured LDAP server and now will use ldap credentials to access centralized data/ service like NFS share.


What is SELinux?

SELinux stands for Security-Enhanced Linux. Its set of security modules/policies are going to apply on machine to increase the overall security of the server.In this modules has been loaded into kernel
while accessing files/services which improves security. This was came with RHEL5 and its more secure comparing to PAM and initd.

Models in SELinux:

Enforcing:
In this model policy has been enforced. It will enforce the policy strictly.

Permissive:
In this model SELinux will give warning, if SELinux policy settings breached.

Disabled:
In this model SELinux totally is disabled.

Levels in SELinux:
SELinux uses two levels.
Targeted – Targeted processes/services are protected by SELinux
Mls – Multi level security protection

Command to check the SELinux status:

[root@server ~]#getenforce
permissive

Output will be “enabled” or “disbaled”

Command to check SELinux status in simplified way:

[root@server ~]# sestatus
SELinux status: enabled
SELinuxfs mount: /sys/fs/selinux
SELinux root directory: /etc/selinux
Loaded policy name: targeted
Current mode: permissive
Mode from config file: permissive
Policy MLS status: enabled
Policy deny_unknown status: allowed
Max kernel policy version: 28


Command to check SELinux status in detailed:

[root@server ~]# sestatus -b
SELinux status: enabled
SELinuxfs mount: /sys/fs/selinux
SELinux root directory: /etc/selinux
Loaded policy name: targeted
Current mode: permissive
Mode from config file: permissive
Policy MLS status: enabled
Policy deny_unknown status: allowed
Max kernel policy version: 28

Policy booleans:
abrt_anon_write off
abrt_handle_event off
abrt_upload_watch_anon_write on
antivirus_can_scan_system off
antivirus_use_jit off
auditadm_exec_content on
authlogin_nsswitch_use_ldap off
authlogin_radius off
authlogin_yubikey off
awstats_purge_apache_log_files off
boinc_execmem on
cdrecord_read_content off
cluster_can_network_connect off
cluster_manage_all_files off
cluster_use_execmem off
cobbler_anon_write off

How to disbale SELinux?

Using two ways will disable SELinux.

1. To disbale permanently will edit the /etc/selinux/config file and change the status from
enforce to disbaled


2. To disbale temporarily execute the below command

 #echo 0 > /selinux/enforce

or

 #setenforce 0

How to enable SELinux?

Same like above will enable SELinux using two ways

1. To enable permanently will edit the /etc/selinux/config file and change the status from
disbaled to enforce

2. To enable temporarily execute the below command

 #echo 1 > /selinux/enforce

or

 #setenforce 1


Command to list all the modules:

[root@server ~]# semodule -l
abrt
accountsd
acct
afs
aiccu
aide
ajaxterm
alsa
amanda
amtu
anaconda
antivirus
apache
apcupsd
apm
application

Command to enable a module:

in below command use -v  key to show what this command was doing.

[root@server ~]# semodule -v -e application
Attempting to enable module 'application':
Ok: return value of 0.
Committing changes:
Ok: transaction number 0.

Command to disable a module:

[root@server ~]# semodule -v -d application
Attempting to disable module 'application':
Ok: return value of 0.
Committing changes:


Linux Basic Commands: ls, mkdir, rm, cd, pwd, cat, touch

ls  command will list all files and directory.

[root@server ~]# ls
192.168.0.101 Downloads ks.cfg Pictures Templates
file25 localhost Public testscript1.sh
file26 mem.sh testscript.sh

ls -a will list all including hidden files.

[root@server ~]# ls -a
. chandu forloop1 Music sedfile
.. .config forloop2.sh numbers server
192.168.0.101 .cshrc hst.txt output .ssh
abu data .ICEauthority output1 tcp.txt

mkdir command will help us to create a directory.

[root@server ~]# mkdir test

To delete a directory use rm -rf command with directory name.

[root@server ~]# rm -rf test

cd <dir_name> command will change to named directory.

[root@server ~]# cd data

cd ~ command will change to home directory of current user.

[root@server ~]# cd ~
[root@server ~]# pwd
/root

cd .. command will change to parent directory of present working directory.

[root@server ~]# cd ..
[root@server /]# pwd
/

pwd command will print present working directory

[root@server etc]# pwd
/etc

rm  command will remove file and it will ask for user confirmation.


[root@server ~]# rm file1
rm: remove regular empty file ‘file1’? y

To delete a file without user confirmation will use  -f  option.

[root@server ~]# rm -f file1

will use vi editor, cat and touch to create files. touch command will create empty files.

[root@server ~]# touch file1

will explain about vi editor in next post, because we have multiple operation to explain in vi editor and now will see cat command operations.

creating and reading file using cat command:

After entering your content to the file, press enter to go next line and then press  ctrl+c  to save and exit from the file.

For reading a file use cat <filename> syntax like below mentioned.

[root@server ~]# cat > file2
This is a test file
^C
[root@server ~]# cat file2
This is a test file

use the below command to append one file content to another file. In this method it will not remove the existing contents from the file and it will just copy next to the last line.

Even if we doesn’t have file3, it will create automatically and copy the file2 content to the file3

[root@server ~]# cat file2 >> file3

using below command will copy the content from two file and will paste it in a single file. to paste the content in existing file use >> symbol instead of >, it will help to paste the two files content without deleting or modifying existing content.

[root@server ~]# cat file2 file3 > file4


How to perform kickstart installation for Linux ?

What is Kickstart installation?

Kick start installation is unattended installation, where we can install the operating system
without fully seated in front of system till completing the installation.

Here we need to create a kickstart configuration file which contains all the details like,
Language, Timezone, Network details, Partition details, Package details, etc…

1. Creating a Kickstart configuration File

by default kickstart configuration file will be available in /root directory with the name of anaconda-ks.cfg in linux machine which is already installed. by editing this file will create new kickstart file for our requirement. But comparing to this method will create kickstart file in Graphical mode which will be very easier way.

GUI mode should be working in our machine to create kickstart file in Graphical utility.

Login the server in Graphical mode as root user and issue the below command to open the kickstart file configuration window.

[root@server ~]# system-config-kickstart

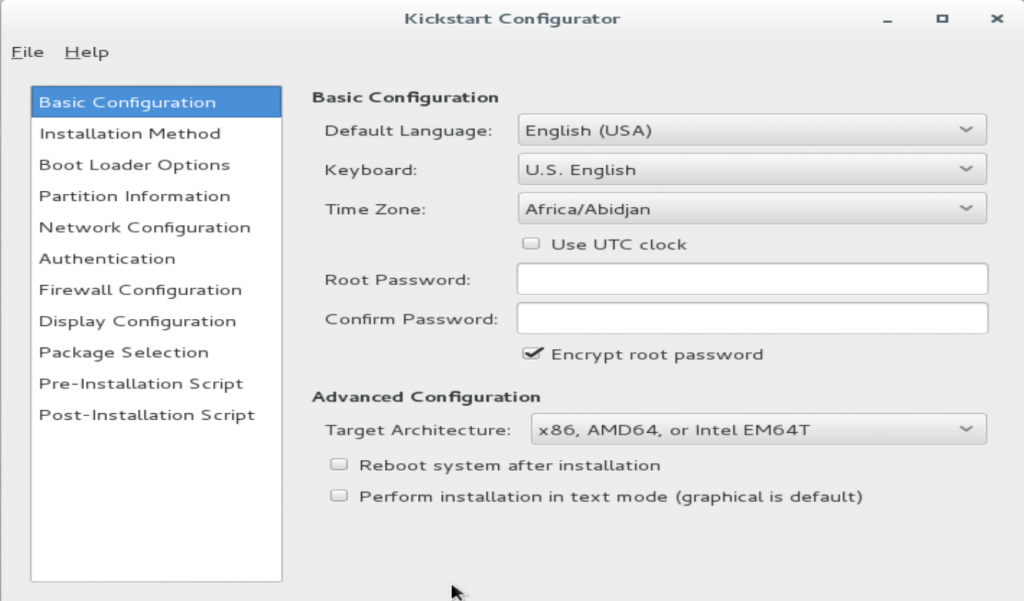
will get a window now to configure new kickstart file.

Using above window we need provide the required details in each section by selecting the option which is available in left pane.

Basic Configuration:

Default and keyboard Layout Language, Time Zone, Root password, Architecture and Reboot option after installation the Operating system.

Installation Method:

Whether its going to be a new installation or upgrade and which source we are going to use for OS media.

Boot Loader Option:

Its advisable to use “Install new boot loader” option.

Partition Information: 

Depends on your requirement you can create partitions or you may leave it to create automatically by the OS.

Network Configuration:

Based on your requirement you can provide static or DHCP IP’s and you should select the adapter first for that.

Authentication, Firewall Configuration & Display Configuration:

You may leave it by default. If you have any specific reason you can select the option.

Package Selection:

Here we need to provide what type of server you are going to install. Like, Web server,  Minimal package, DNS Server, Application Server, etc…

By default it will be minimal only.

Pre and Post Installation Script:

You may leave it.

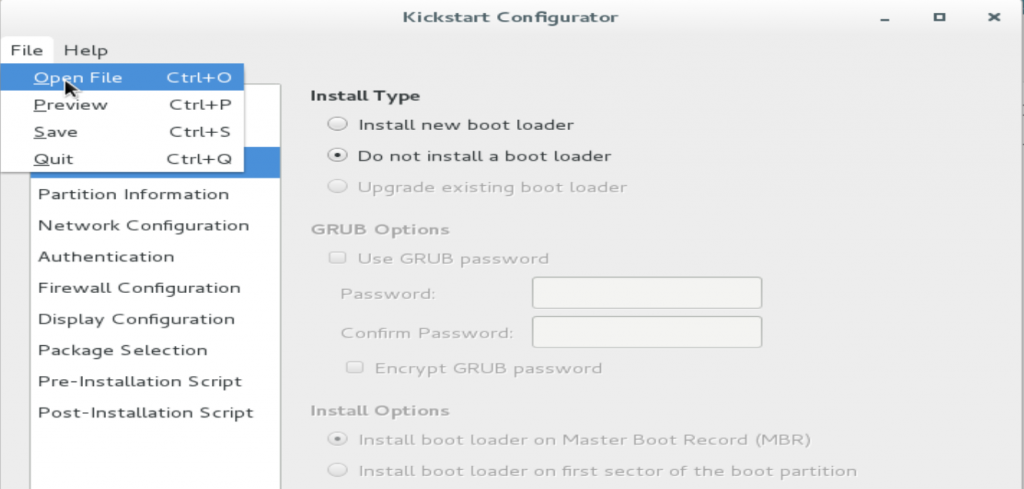
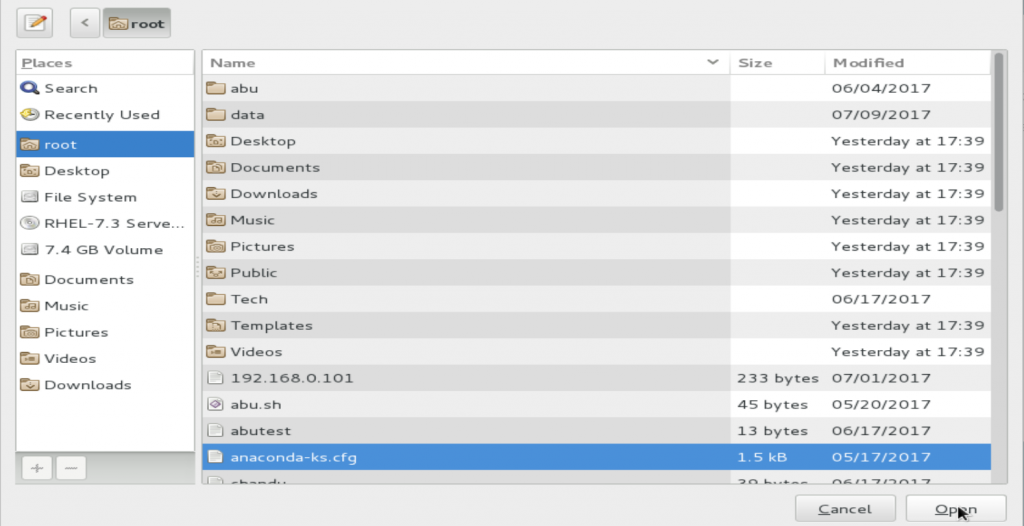
After creating file use file-> save option to save the configuration. Here i’m saving this file under /root  with  ks.cfg name.

If you are going to create same configuration Operating system you can open the existing file which is available in you machine under /root directory.

2. Verifying the Kickstart File

After created the kickstart configuration file will verify using below command. We should install the package called ypkickstart to run the command.

ksvalidator command will help to verify the created kickstart file

[root@server ~]# yum install ypkickstart

[root@server ~]# ksvalidator /root/ks.cfg

3. Making the Kickstart File Available

Now i’m going to use http service to access created kickstart file through network for unattended  installation.

Simply install httpd package and start the service in remote machine where we are going to kept kickstart file.

Then copying created kickstart file from /root to /var/www/html/kickstart/  which is default location where the pages available to access using http service on browser.

[root@server ~]# yum install httpd
[root@server ~]# systemctl start httpd
[root@server ~]# cp /root/ks.cfg /var/www/html/kickstart/

4. Making the Installation Source Available

This section is pointing that which source of OS media we are going to use for this installation. We can use Local media, NFS, HTTP, HTTPS, FTP.

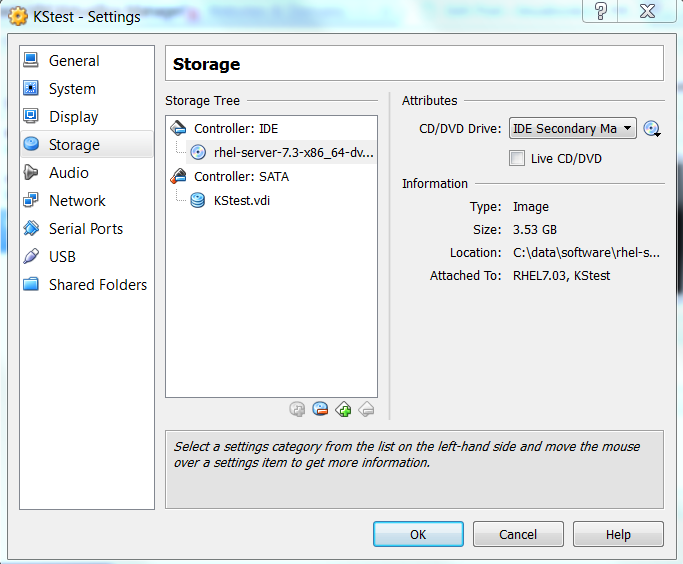
For Local media installation simply will use OS media or OS image file, if we are going to install in Virtual Machine and for other options OS image will be placed in remote machine and will be accessed using anyone of mentioned protocol.

In our case going to install in VMWare using Local media(OS Image file) source with kickstart file, which will be placed in remote machine and going to use http service to access kickstart file.

5. Starting the Kickstart Installation

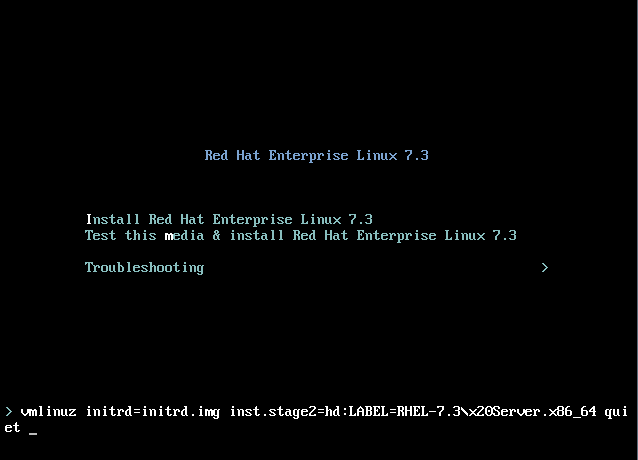
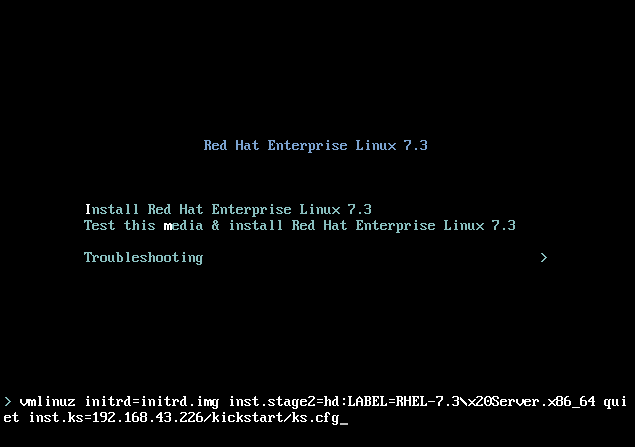
Now start the virtual machine which is create in VMWare and interrupt by pressing Tab  key in keyborad and will get the screen like below.

Now insert the below entry to mention the kickstart file http location like below.

inst.ks=http://192.168.43.226/kickstart/ks.cfg

Then press enter to begin the installation.

Configuring bonding on RHEL7 step by step

What is ?

Two or more than that network adapters in corporate with single logical network pipe.

Logical network interface work as master and physical network interfaces are work as slave.

IP Address is assigned to  logical interface instead of assigning physical interfaces.

Logical interface only will work on connecting any internal/external network traffic.

It has several modes of operations based on behavior.

Modes:

  1. Round robin
  2. Active backup
  3. XOR
  4. Broadcast

Advantages:

  1. Better throughput
  2. Load balancing
  3. Fault tolerance

Issue ip a command to check available interfaces in server.

in my server, i have two insterfaces called enp0s3  and enp0s8

Using mobprobe command load the bonding kernel if its not loaded already.

[root@server ~]# modprobe bonding

To check whether the bonding driver in kernel  use the modinfo command and that will list the details like below once its loaded.

[root@server ~]# modinfo bonding
 filename: /lib/modules/3.10.0-514.el7.x86_64/kernel/drivers/net/bonding/bonding.ko
 author: Thomas Davis, [email protected] and many others
 description: Ethernet Channel Bonding Driver, v3.7.1
 version: 3.7.1
 license: GPL
 alias: rtnl-link-bond
 rhelversion: 7.3
 srcversion: B664145ACFBCC961505C750
 depends:
 intree: Y
 vermagic: 3.10.0-514.el7.x86_64 SMP mod_unload modversions

Create a file called ifcfg-bond0 which will work as logical interface in bonding using vi editor with below mentioned settings under /etc/sysconfig/network-scripts

[root@server ~]# vi /etc/sysconfig/network-scripts/ifcfg-bond0

DEVICE=bond0
 TYPE=Bond
 NAME=bond0
 BONDING_MASTER=yes
 BOOTPROTO=none
 ONBOOT=yes
 IPADDR=192.168.43.250
 NETMASK=255.255.255.0
 GATEWAY=192.168.43.1
 BONDING_OPTS="mode=5 miimon=100"
 ZONE=public

:wq

save and exit from the file.

now the bond0 logical interface has been created and have to set the slave interface by following below steps.

in our case already we have two interfaces called enp0s3 and enp0s8. for the same configuration file also already there under /etc/sysconfig/network-scripts with below name’s

ifcfg-enp0s3

ifcfg-enp0s8

edit the above two files using vi editor and make entry for MASTER and SLAVE. Set the MASTER=bond0 and SLAVE=Yes for the both interface configuration files like below.

[root@server ~]# vi /etc/sysconfig/network-scripts/ifcfg-enp0s3

TYPE=Ethernet
 NAME=enp0s3
 UUID=f42b80f0-95dd-4126-a5f8-62db4f4a368f
 DEVICE=enp0s3
 ONBOOT=yes
 MASTER=bond0
 SLAVE=Yes


[root@server ~]# vi /etc/sysconfig/network-scripts/ifcfg-enp0s8

TYPE=Ethernet
 NAME=enp0s8
 DEVICE=enp0s8

UUID=f42b80f0-95dd-4126-a5f8-62db4f4a368f
 ONBOOT=yes
 MASTER=bond0
 SLAVE=Yes


Now use ifdown and ifup command to bring down and bring up the bond0 interface.

[root@server ~]# ifdown bond0
../network: line 2: NETWORKING: command not found
Device 'bond0' successfully disconnected.
[root@server ~]# ifup bond0
../network: line 2: NETWORKING: command not found
Connection successfully activated (D-Bus active path: /org/freedesktop/NetworkManager/ActiveConnection/16)


Then check the ip of bond0 to confirm whether our bonding has been working or not.

[root@server ~]# ip a | grep bond0
6: bond0: <NO-CARRIER,BROADCAST,MULTICAST,MASTER,UP> mtu 1500 qdisc noqueue state DOWN qlen 1000
 inet 192.168.43.250/24 brd 192.168.43.255 scope global bond0


We configured bonding successfully. Now will communicate from remote server to this server using bond0 interface ip address (192.168.43.250)

Thanks for your support 🙂

User and Group Management in Linux/Unix

User and Group Management in Linux/Unix

We are going to see User and Group Management in Linux/Unix in this post.

 /etc/passwd   ->  This file contains all the users details.

[root@server ~]# more /etc/passwd
root:x:0:0:root:/root:/bin/bash
bin:x:1:1:bin:/bin:/sbin/nologin
daemon:x:2:2:daemon:/sbin:/sbin/nologin
adm:x:3:4:adm:/var/adm:/sbin/nologin

/etc/passwd file has all the user details with some parameters.

Here i’m taking root user details to explain with details.

root:x:0:0:root:/root:/bin/bash

root – User name

x – Password

0 – User ID

0 – Group ID

Root – Comments/ User description

/root – Home directory

/bin/bash  – shell

Home directory and Group will be created with the same name of user, once we created a user.

Command to create user:

Useradd <username>

adduser <username>

Example:

[root@server ~]# useradd anand

[root@server ~]# adduser anand

Command to delete user account:

deluser <username>

[root@server ~]# userdel anand

The above command will delete a user but will not delete home directory of the user.

Command to delete a user account with home directory:

Use option -r to delete user with home directory.

[root@server ~]# userdel –r deepak

Use id command to know whether a user available in system and if the user exist, it will display User ID, Group ID and Primary group and Secondary group details.

[root@server ~]# id abu
uid=1000(abu) gid=1011(Technology) groups=1011(Technology),1012(DBcheck)

Command to add secondary group to a user:

[root@server ~]# usermod –G Technology abu

Command to change primary group:

[root@server ~]# usermod –g Technology abu

Customizing home directory:

by default home directory will be created under /home for all the users. We can set some other directory as home directory as well.

we have two options to change the home directory.

  1. we can edit /etc/passwd file using vi editor to change the home directory
  2. Using usermod command will change home directory

Changing home directory by editing /etc/passwd  file

[root@server ~]# vi /etc/passwd
testuser:x:1004:1004::/testuser:/bin/bash

Command to change home directory:

[root@server ~]# usermod -m -d /testuser testuser

-m:    option to move the home directory

-d:      option to mention the home directory

Assigning expiry date to user:

Command to check expiry details for a user

[root@server ~]# chage -l testuser
Last password change : May 27, 2017
Password expires : never
Password inactive : never
Account expires : never
Minimum number of days between password change : 0
Maximum number of days between password change : 99999
Number of days of warning before password expires : 7

Command to set expiry date for a user:

[root@server ~]# usermod --expiredate=2017-07-20 testuser

Again will check whether the expire date has been set or not.

[root@server ~]# chage -l testuser
Last password change : May 27, 2017
Password expires : never
Password inactive : never
Account expires : Jul 20, 2017
Minimum number of days between password change : 0
Maximum number of days between password change : 99999
Number of days of warning before password expires : 7

We successfully set expire date for testuser.

Group Management:

Group is used to manage more than one users without touching the each and every user alone.

Group is created based on the Team on an organization.

All the group details available in /etc/group file, once we created a group.

[root@server ~]# more /etc/group

Using Groupadd command will create group

[root@server ~]# groupadd Technology


NFS Server Configuration RHEL 7 / Cent OS 7

Using NFS server will share the files/ Directories over the network.
Using this service will install operating system and access the remote server directory/file to read/write files and will share the file/directory to other machines.

Required Package:

libnfsidmap-0.25-15.el7.x86_64
nfs-utils-1.3.0-0.33.el7.x86_64

Installing NFS packages:

Use the below command to install all the required packages in one shot.

#yum install nfs*


Check whether the packages are installed by executing below command

[root@server ~]# rpm -qa | grep nfs
libnfsidmap-0.25-15.el7.x86_64
nfsometer-1.7-1.el7.noarch
nfs4-acl-tools-0.3.3-15.el7.x86_64
nfs-utils-1.3.0-0.33.el7.x86_64
nfstest-2.1.1-0.0.el7.noarch

Important configuration files:

/etc/exports :                This file contains which all are exported to remote                                                                 machines 
/etc/host.allow :           Daemon/ Client which matches the entry available in                                                        this file, will be granted access.
/etc/host.deny :           Access is denied for daemon/ client which matches in                                                     this file.
/etc/fstab :                      Will mount the shared directories/ filesystems                                                                   permanently using this file.
/etc/sysconfig/nfs:  Will manage the nfs port using this file.

Services which need to be enabled and started:

rpcbind  service
nfs-server  service

Command to enable the services:

#systemctl enable rpcbind
#systemctl enable nfs-server

[root@server ~]# systemctl enable rpcbind
[root@server ~]# systemctl enable nfs-server
Created symlink from /etc/systemd/system/multi-user.target.wants/nfs-server.service to /usr/lib/systemd/system/nfs-server.service.

Command to start the services:

#systemctl start rpcbind
#systemctl start nfs-server

[root@server ~]# systemctl start nfs-server

[root@server ~]# systemctl start rpcbind

create directory for sharing:

[root@server ~]# mkdir /nfshare

set the all permission to all

#chmod 777 /nfshare

Now share the directory using NFS by mentioning the directory details in /etc/exports file

#vi /etc/exports

/nfsfileshare 192.168.12.7(rw,sync,no_root_squash)

save and exit from the file

Now use the below command to make it available in network as a shared directory

[root@server ~]# exportfs -r

Enable the services permanently in firewall in this session

[root@server ~]# firewall-cmd --permanent --zone public --add-service  mountd
success
[root@server ~]# firewall-cmd --permanent --zone public --add-service rpc-bind
success
[root@server ~]# firewall-cmd --permanent --zone public --add-service nfs
success

reload the firewall  changes and make effect in this session by executing below command

[root@server ~]# firewall-cmd --reload
success


Now all the configuration has been done in server side and have to check and mount the shared directory in client machine.

showmount command will help us to list the directory which is shared from remote machine.

[root@node1 ~]# showmount -e 192.168.43.226
Export list for 192.168.43.226:
/nfshare *

Now we need to mount the shared directory in client. Before that we should create a directory to use that as a mount point.

[root@node1 ~]# mkdir /nfsmount

Mount the directory temporarily

#mount 192.168.43.226:/nfshare  /nfsmount

Mount permanently by editing /etc/fstab file and make entry

#vi /etc/fstab
192.168.43.226:/nfshare/ /nfsmount nfs rw,sync 0 0

save and exit from the file.

unmount the directory because we mounted temporarily before restart and after restart issue mount to check whether the shared directory is listing or not. If its not listing then there is an issue with entry in /etc/fstab file.

#umount /nfsmount

Restart the client and check using mount command

[root@node1 ~]# mount | grep /nfsmount
192.168.43.226:/nfshare/ on /nfsmount type nfs (rw,sync,vers=4,addr=192.168.43.226,clientaddr=192.168.43.67)

What is Linux

What si Linux

What is Linux?

Linux is an operating system, which manages all resources associated with your Desktop, Laptop, and Server. Nowadays it’s used in maximum devices like smartphones. It’s secure and virus free operating systems.

Linux is used in most of the production environment.  We can manage the devices using scripting and can automate job as well. Even we can modify the operating system as per our requirement if you are genius in coding.

It’s easy to install, configure and manage the server in Linux. For all level, user can use the Linux operating system. It has a number of distribution and versions on that distribution.

Distribution list:

Redhat

Ubuntu

Fedora

Debian

Opensuse


We can use below methods to install Linux

  1. Automatic/Unattended/ Network
  2. Manual

Automatic/Unattended/network installation:

We can install Linux operating systems without our presence using below technologies.

  1. Kickstart
  2. NFS
  3. HTTPS/HTTP

In this method, we can define everything, like Packages, Network  IP, DNS, Keyboard language, etc…

Manual installation:

In the manual installation, we should use local installation media for Linux installation.

We are going to discuss Redhat Linux and will see others later on…..

Migration

In this post gonna explain what is migration, types and steps to be followed in migration.

What is Migration?

Migration is used to move the Data/Storage/Server/ from one to another (Server/Storage)

Pre-Requests:

  1. Hardware must be the same or updated one in Destination.
  2. Connectivity should be established between the source and destination.
  3. Tools for Operating System related migrations.

Migration types:

  1. DR Functionality
  2. Forklift

III. MSP Oracle

  1. Storage, Oracle (Storage/ggate)
  2. V2V (LPAR), V2V (VM), V2V (VPAR), V2V (Clone VM)
  3. P2V, P2V (VM), P2V (LPAR), P2V (NPAR) , P2P

VII. Seed-n-Swing (Physical), Seed-n-Swing (VM)

Steps involved in Migration:

  1. Data gathering
  2. Building a New server
  3. Post Provisioning
  4. Start Migration
  5. Decommissioning

Data gathering:

As per my knowledge, I have some details which we need to check from the old server. Details are below Server Name,Building Name,Source DC,Target DC,Migration Method,Environment,Server Status in Tool,HW Server Vendor,Operating System,OS Version,Model of Server,NFS,No of Physical CPUs,No of Cores per CPU,Memory (GB),Number of Physical NICs in Use,NIC Teamed,Data NIC IP address,Data NIC subnet mask,Data NIC gateway,Data NIC MAC Address,Other NIC Ips,DNS Servers in order,Boot From SAN?,VG Name,Free space in VG,LV,No of LUNs,Total External Storage in GB,SAN type seen by Powerpath,Connected HBA WWN,Disconnected HBA WWN,Is HP DDMI Agent Running?,Last reboot – uptime,Forsee any issue in the mig method, based on SAN/Network,Lun counts,Storage type,Array_id,Total Size,Internal Disk size.

Building a New server:

We have to create a new server for migration based on Migration types and keep in mind the date which we gathered from old server. Example: No need of new server like Forklift migrations

Post provisioning:

Once the server build has completed, have to perform below post build tasks

Be compliance in DNS entries and hosts file entries (/etc/hosts), NTP Server Configured or not, Backup is done if it’s necessary, etc… Based on the Data gathering.

We have to vulnerability scan and fix the security patch errors (FAIL’s and WARNING’s) which will be present in the new servers.

Migration:

  1. Create the file systems in new server based on old server with same VG, LV and PV name and size.
  2. Copy the boot file system from source to Destination Server. Need to do manual copy from source to destination server in Linux Server’s like Red hat. Will use tools to take image in AIX, etc…
  3. Have to do rsync the Data filesystem from source to Destination.
  4. Move the LUN’s to the target server if it’s applicable.
  5. Copy the applications from old to target server.
  6. Set the IP Address, DNS and other stuffs based on the Data gathering.
  7. Get the server in live once all these stuffs completed.

Decommissioning the old server:

  1. Check what are all the jobs and applications running and get the help from concern team to stop the running applications.
  2. Temporarily disable the backup, Mail, triggers, Disconnect the Database, Disable the NIC (Ethernet).
  3. Wait for some days without shutting down the server to confirm whether we are getting any call back from any team for any issue in new server.
  4. If we don’t hear any issues then will go ahead with disabling backup, mail, Triggers, Database, Network permanently.
  5. And then will turn of the server the Server and will remove the server from Rack.

Thanks for choosing the blog. Comments are welcome…

Multipathing in Linux

Multipathing is used for Load Balancing, path failover & Recover for block devices in Linux.

Load balancing:

The workload is distributed across the available hardware components.

Path failover & Recover:

Will use redundant I/O channels to redirect the read and write operations when one or more paths no longer available.

Prerequisites RPM’s:

  1. device-mapper-1.02.77-9.el6.x86_64
  2. device-mapper-multipath-libs-0.4.9-64.0.1.el6.x86_64
  3. device-mapper-multipath-0.4.9-64.0.1.el6.x86_64

Daemon: Multipathd

Configuration file: /etc/multipath.conf

The “multipath.conf” has five sections:

  1. System level defaults
  2. Blacklisted devices
  3. Blacklist exceptions
  4. Storage controller specific settings
  5. Device specific settings

Simple steps to configure multipath:

  1. For configuring the Multipath in Redhat Linux, device-mapper-multipath should be installed. You can verify It by using below command that it is installed or not:

#rpm -q device-mapper*

  1. If it is not installed, install it by using below command.

#yum install device-mapper

  1. After installation, start to configure multipath

#cd /etc

#mv multipath.conf multipath.conf.dist

#sed ‘/^#/d; /^$/d’ multipath.conf.dist > multipath.conf

#vi multipath.conf

Change to blacklist local hard drive only,

blacklist {
devnode “sda”
}

  1. Now start the Multipath service

#Service Multipathd start
#chkconfig Multipathd on

  1. Now Verify the disk paths

#fdisk -l
#sfdisk –s

Commands:


#service Multipathd start – to start the multipath service

#service Multipathd stop – to stop the multipath service

#service Multipathd reload – To update the modified configurations to replicate without restarting the service.

#multipath –ll – To list all the multipathed devices

#multipath –F – to stop the multipath