what is split brain syndrome in clusters?

In this post we are going to see what is split brain syndrome in clusters?

Split brain syndrome is a state on a cluster where each cluster nodes are divided into small clusters and each one will believe themselves as itself only an active cluster.

Each nodes believes that all other nodes are dead and simultaneously will try to access the same data/ disks, which can be lead to data corruption. This situation will occur during the cluster reformation.

When one or more nodes fails, the cluster itself will reform the cluster with the available nodes.

Note: High Availability clusters will use some mechanism like CMAN, Pacemaker, HP ServiceGaurd, and Linux HA to avoid split brain syndrome.

Common methods to address split brain syndrome:

  1. I/O Fencing
  2. Quorum/ Local Disk
  3. Quorum Server
  4. Tie – Breakers
  5. STONITH(Shoot The Other Node In The Head)

How to boot with an old kernel in RHEL4,5,6/CentOS

In this post, we are going to see How to boot with an old kernel in RHEL4,5,6/CentOS Operating systems.

How to boot with an old kernel in RHEL4,5,6/CentOS

RedHat Operating System uses GRUB boot loader as default one globally.

We can boot update the kernel using Yum/ RPM Package management like other package upgrades which we are doing.

Use the below command to know which boot loader installed on your OS.

#grubby -bootloader-probe

Changing kernel:

/boot/grub/grub.conf is the grub configuration file.

#cat /boot/grub/grub.conf 

default=0 timeout=5 password --encrypted $6$GXGrYVEnbKXAnQoT$p64OkyclNDt4qM2q47GMsgNxJxQaclNs79gvYYsl4h07ReDtJpt5P5kQn1KQ52u2eW8pKHTqcG50ffv0UlRcW0 splashimage=(hd0,0)/grub/splash.xpm.gz hiddenmenu title Red Hat Enterprise Linux 6.4 (2.6.32-358.el6.x86_64) ===> kernel 0 root (hd0,0) kernel /vmlinuz-2.6.32-358.el6.x86_64 ro root=/dev/mapper/vg_geeklab-lv_root rd_NO_LUKS KEYBOARDTYPE=pc KEYTABLE=us LANG=en_US.UTF-8 rd_NO_MD SYSFONT=latarcyrheb-sun16 crashkernel=auto rd_LVM_LV=vg_geeklab/lv_swap rd_LVM_LV=vg_geeklab/lv_root rd_NO_DM rhgb quiet initrd /initramfs-2.6.32-358.el6.x86_64.img title Red Hat Enterprise Linux 6.3 (2.6.32-279.el6.x86_64) ===> kernel 1 root (hd0,0) kernel /vmlinuz-2.6.32-279.el6.x86_64 ro root=/dev/mapper/vg_geeklab-lv_root rd_NO_LUKS KEYBOARDTYPE=pc KEYTABLE=us LANG=en_US.UTF-8 rd_NO_MD SYSFONT=latarcyrheb-sun16 crashkernel=auto rd_LVM_LV=vg_geeklab/lv_swap rd_LVM_LV=vg_geeklab/lv_root rd_NO_DM rhgb quiet initrd /initramfs-2.6.32-279.el6.x86_64.img

In this, we can see Default will be 0. From this, we can understand OS will read by the default top kernel.

Whenever we are upgrading the kernel that will be coming up and considered as 0 and old kernel will be marked as 1.

So, We should change the number from “0” to “1” on below line of /boot/grub/grub.conf file using vi editor and save it.

default=1

We done the needed configuration change to boot the OS with an old kernel.

On the next boot it will take effect.

Using below command reboot the system and then check whether its booting with old kernel or new one.

#shutdown -r now

Use the below command to check the kernel versions which is in use right now

#uname -r

awk command in linux

awk command in linux

We are going to see how to use awk command in Linux in this post.

It’s a scripting language and it’s used to generate Reports and Data Manipulation.

Syntax:

#awk <option> 'criteria {action}' input_file > output_file

Awk command to print file content:

[root@localhost ~]# awk '{print}' testfile.txt
Abu 1234
Thahir 5678
Tharun 9101
Rishi 2345

Above example is only to print all the content of a file.

Awk command to print the lines which match with the given pattern:

[root@localhost ~]# awk '/Rishi/{print}' testfile.txt
Rishi 2345

awk command to split a line to fields:

$1 will be considered the first word as the first field in a line. accordingly $2,$3, etc…

[root@localhost ~]# awk '{print $2}' testfile.txt
1234
5678
9101
2345
[root@localhost ~]#

Built-in variables in awk:

NF:     We can print the last field of the lines by using NF in awk command

Example: 

[root@localhost ~]# awk '{print $NF}' testfile.txt
25000
30000
20000
15000

NR:     Using NR built-in option, we can print the specific fields along with line numbers and can print all content of a file along with the line numbers. Also, we can print the range of lines using NR in awk command.

Examples:

1. Displaying specific row with a specific field in a file

[root@localhost ~]# awk 'NR==2 {print $1,$3}' testfile.txt
Thahir 30000

2.Displaying content of a range of lines(from 2 to 4th line)

[root@localhost ~]# awk 'NR==2, NR==4 {print $1,$3}' testfile.txt
Thahir 30000
Tharun 20000
Rishi 15000


Thanks for reading our blog. Please drop your comments.

How to install Ansible on RHEL7/ CentOS7

We are going to see how to install Ansible on RHEL7/ CentOS7 in this post.

Control node needs to install Python 2.6 or latest version and windows doesn’t support for control node.

Since the ansible agentless tool, on Managed hosts no need to install any specific agent/client. And need to install python 2.4 or latest version on managed hosts.

How to install Ansible on RHEL7/ CentOS7

Installing Ansible on RHEL7/ CentOS7:

To install the Ansible we should have Enabled EPEL repository on our server already

Once enable EPEL Repo, then we can start installing Ansible using yum.

[root@localhost ~]# yum install ansible -y

Post installation of ansible will check the version of Ansible by using below command

[root@localhost ~]# ansible --version
ansible 2.7.9
 config file = /etc/ansible/ansible.cfg
 configured module search path = [u'/root/.ansible/plugins/modules', u'/usr/share/ansible/plugins/modules']
 ansible python module location = /usr/lib/python2.7/site-packages/ansible
 executable location = /usr/bin/ansible
 python version = 2.7.5 (default, Aug 2 2016, 04:20:16) [GCC 4.8.5 20150623 (Red Hat 4.8.5-4)]
[root@localhost ~]#

Finally, we installed ansible over our machine which we are going to take it as a control node.

Hereafter if we want to deploy or manage any remote hosts(Managed Host) from the control node, SSH authentication is mandatory. So, We should copy and paste the SSH keys to the remote hosts to make the communication available between the control and managed node.


Reference: Ansible documented site


How to enable EPEL Repository on RHEL7/CentOS7

In this post, we are going to see How to enable EPEL Repository on RHEL7/CentOS7

How to enable EPEL Repository on RHEL7/CentOS7

Need to install EPEL rpm by using below command:

[root@localhost ~]# rpm -Uvh https://dl.fedoraproject.org/pub/epel/epel-release-latest-7.noarch.rpm

Out will be like below

Retrieving https://dl.fedoraproject.org/pub/epel/epel-release-latest-7.noarch.rpm
warning: /var/tmp/rpm-tmp.CmU1nG: Header V3 RSA/SHA256 Signature, key ID 352c64e5: NOKEY
Preparing... ################################# [100%]
Updating / installing...
 1:epel-release-7-11 ################################# [100%]
[root@localhost ~]#

Now we installed the Repo and need to check by listing the installed repo using below command:

[root@localhost ~]# yum repolist

List the available packages from EPEL Repository using below command:

[root@localhost ~]# yum --disablerepo=* --enablerepo=epel list

Now we Enabled EPEL Repository successfully on our server and we can use yum to install the packages.


Thanks for the reading this post.

Reference: ITZgeek

Architecture of Ansible

we are going to see the Architecture of Ansible in this post.

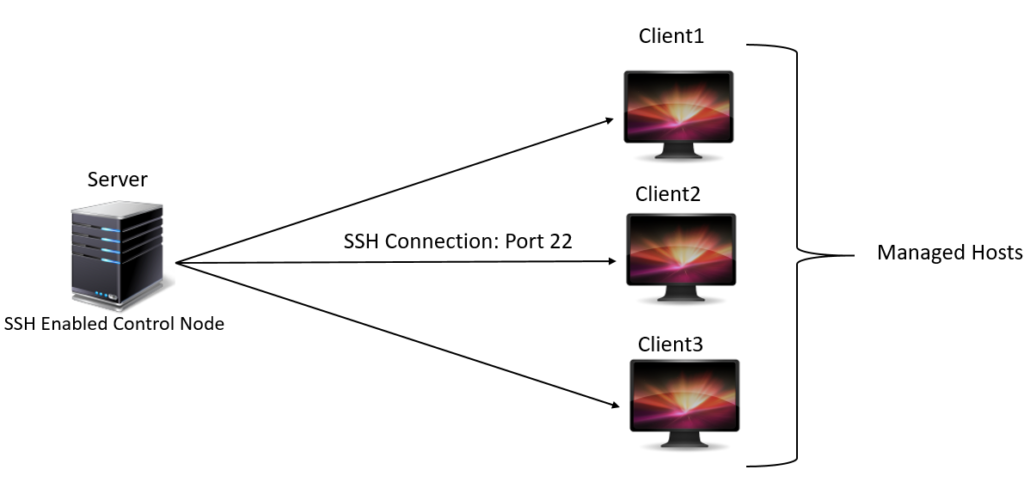
Communication:

Architecture of Ansible

Communication established between control node(Server) and Managed hosts(Client machines) using SSH Protocol.

A normal user will be sufficient for communication between Control and Managed hosts.

A normal user can able to perform a few tasks but for other tasks, we need administrators user or other users who have sudo access to perfom that tasks.

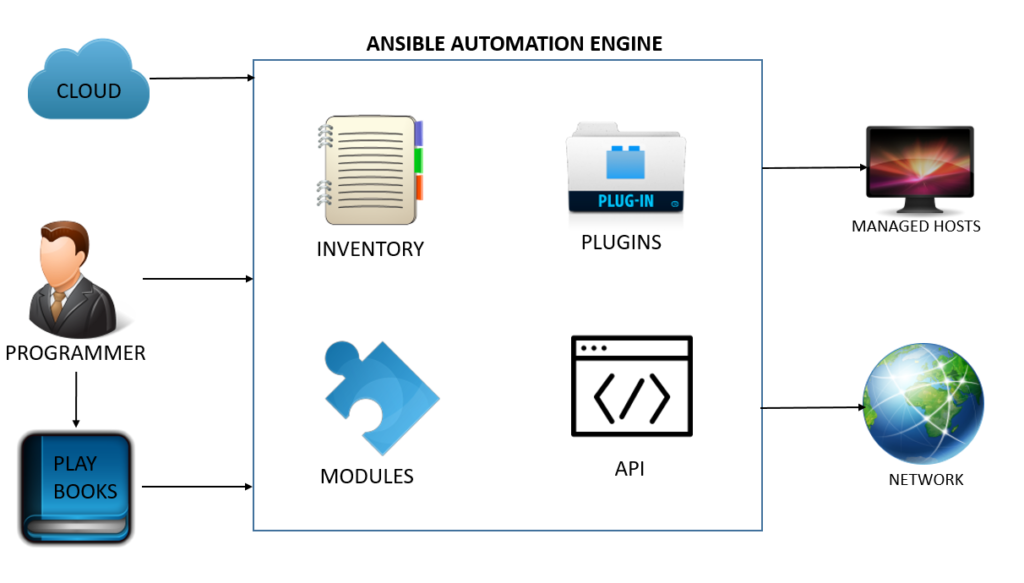
complete Architecture detail of Ansible:

Architecture of Ansible


This will explain how the ansible working and what are all the things contains as architecture.

As we can see the above diagram ansible automation engine will interact directly with the person who writes playbooks to do tasks.

It also interacts with the cloud(public/private) directly. Basically its CMDB(Configuration Management Data Base).

Also, it contains the below components:

  1. Inventory
  2. Modules
  3. API
  4. Plugins


Inventory:

Inventory will contain the List of Host or IP Address of Host/ Wildcards where we are going to do automation tasks using ansible.

default ansible inventory path: /etc/ansible/hosts

We can specify the different inventory path using -i option.

Modules:

Ansible has more 1000 readymade playbooks in it and we should use those modules in paybooks to do automation tasks. Modules will be copied from Control node to managed hosts while executing the tasks and it will run the program based on playbook and Module then will give back us the output.

Also, the user can create custom playbooks based on their needs.

We should mention the modules in playbooks and modules will be directly executed in remote hosts through playbooks and will get the output.

API:

Ansible uses API as transport  for Cloud services.

Plugins:

Plugins will enhance the features ansible.

Plugins will allow executing the task on build stat. Its a piece of code.

Using ansible we can automate the tasks on different types of network.


Introduction of Ansible automation tool

We are going to see Introduction of Ansible automation tool in this post. By reading the future post you can learn full ansible automation and it’s purely based on RedHat Linux.

Ansible is written by Micheal DeHaan

What is Ansible?

It’s a simple IT automation and powerful configuration management tool which is written in python.

It’s an open source configuration management tool.

We can standardize our environment configuration from one server to all other remote servers using ansible by creating the playbooks to complete that task.

Mainly it’s agentless automation tool. Work is pushed to the remote host when the ansible executed.

What we can do:

  • Configuration of Servers
  • Application Deployments
  • Continuous testing of existing application
  • Provisioning
  • Orchestration
  • Automating our administration tasks


What we cannot do:

  • We cannot install the initial minimum installation of the system.
  • We cannot monitor the servers
  • It will not track what changes are made over the files on the system.

How the Ansible work:


Introduction of Ansible automation tool

Ansible Syntax (or) ansible adhoc command:

Ex:

#Ansible -m command -a "uptime" Test


Ansible:- Keyword

m:- Module

command:- Module Name

uptime:-  OSCommand

Test:- Target server Group


Ansible Features:

  • Easy to learn
  • Written in python
  • Agentless
  • YAML based playbooks
  • Ansible Galaxy

Ansible Modules:

It’s having 1375 modules. For each and every operation we need to use modules to run the commands.

So we should understand the modules to do automation.


How to clear UDID mismatch in VCS Cluster(online thinrclm udid_mismatch)?

In this post, we are going to see How to clear UDID mismatch in VCS Cluster(online thinrclm udid_mismatch)?

We are doing this activity in VCS 3 node cluster with Linux environment.

In VCS Cluster udid_mismtach might lead to disk failures.

Error:
#vxdisk -l alldgs list | grep udid
emc4_184a auto:cdsdisk   -   (vxfendg)   online thinrclm udid_mismatch
emc4_184b auto:cdsdisk   -   (vxfendg)   online thinrclm udid_mismatch
emc4_184c auto:cdsdisk   -   (vxfendg)   online thinrclm udid_mismatch
Resolution:

Verify the fencing disks using “vxdisk -l alldgs list | grep udid” command to know whether it’s having udid_mismatch or not. Using that command we came to know all the three fencing disks has udid_mismatch.

#vxdisk -l alldgs list | grep udid
emc4_184a auto:cdsdisk   -   (vxfendg)   online thinrclm udid_mismatch
emc4_184b auto:cdsdisk   -   (vxfendg)   online thinrclm udid_mismatch
emc4_184c auto:cdsdisk   -   (vxfendg)   online thinrclm udid_mismatch

Verify the all 3 disks udid and udid_asl values are different or not.

Using below command we found that, udid & udid_mismatch values are different.

#vxdisk -v list emc4_184a | grep -i udid 
flags:   online  ready  private autoconfig udid_mismatch coordinator thinrclm 
udid:   EMC%5FSYMMETRIX%5FF000197500111%5F110184A008 
tag:     udid_asl=EMC%5FSYNNETRIX%5F000195702690%5F9002F64000

How to clear UDID mismatch in VCS Cluster(online thinrclm udid_mismatch)?


Like the above use the same command to check udid & udid_mismatch values for another two disks(emc4_184b, emc4_184c)

Then check whether the fencing keys on the coordinator disks are fine using below command

#vxfenadm -s /dev/vx/rdmp/emc4_184a

All the fencing keys are looking good on the coordinator disks.

How to clear UDID mismatch in VCS Cluster(online thinrclm udid_mismatch)?

Finally, command to clear the udid_mismatch flag from all 3 fencing disks.

#vxdisk updateudid emc4_184a

#vxdisk updateudid emc4_184b

#vxdisk updateudid emc4_184c

Confirm udid_mismatch has been cleared or not using the below command.

#vxdisk -o alldgs list | grep -i udid

How to install Docker EE in RHEL7

How to install Docker EE in RHEL7

Will see How to install Docker EE in RHEL7 in this post. We have other steps as well on our blog to install the Docker in Linux.

It’s a container virtualization technology and more efficient in the deploy an application.

We have two option to install the Docker EE in RedHat Linux.

  1. Yum Repository: Create/ Enable YUM Repository and install using that. this is the recommended one to install/ upgrade a package in Linux.
  2. RPM: We have to download and install manually. This will be useful to install when the system doesn’t have internet access.

Requirement:

RHEL 7.1 or Higher Operating System.

overlay2 or device-mapper storage driver(direct-lvm mode for production environment)

Yum repository.

Disable SELinux in IBM Power Systems before install/ Upgrade

Enabling YUM Repository for Docker EE Installation:

Browse “https://store.docker.com/my-content” and login. You should at least registered for the trail.

Once logged in, Click “Setup” to get the URL to enable the repository.

Copy the URL from “Copy and paste this URL to download your Edition:” and save it for later use.

You will use this URL to create the variable called “DOCKERURL“.

Use the below command to remove existing docker repo.

[root@localhost ~]# rm /etc/yum.repos.d/docker*.repo

Save the copied URL in the environmental variable(DOCKERURL). Replace with URL where “<DOCKER-URL>” is mentioned in below command.

#export DOCKERURL="<DOCKER-EE-URL>"

Than now store the variable(DOCKERURL) in yum variable /etc/yum/vars

[root@localhost ~]# sudo -E sh -c 'echo "$DOCKERURL/rhel" > /etc/yum/vars/dockerurl'

Now store the OS version in /etc/yum/vars/dockerosversion:

[root@localhost ~]# sh -c 'echo "7.3" > /etc/yum/vars/dockerosversion'

Then install the required packages yum-utils, device-mapper-persistent-data and lvm2

[root@localhost ~]# yum -y install yum-utils device-mapper-persistent-data lvm2

Now will enable extras RHEL repository and This will ensure the access to container-selinux which is package required by “Docker-EE” and the below command will be used in all Architecture except IBM Power Systems.

[root@localhost ~]# yum-config-manager --enable rhel-7-server-extras-rpms
Loaded plugins: product-id

For IBM Power System use the below command:

#yum-config-manager --enable extras
#subscription-manager repos --enable=rhel-7-for-power-le-extras-rpms
#yum makecache fast
#yum -y install container-selinux

Add the Docker EE repository using below command.

[root@localhost ~]# yum-config-manager --add-repo "$DOCKERURL/rhel/docker-ee.repo"

Installing Docker EE in RedHat Linux:

Now using the docker repository will install the Docker-EE by executing below command.

[root@localhost ~]# yum install docker-ee

Note: If the above command failed for “container-selinux” dependency. Then we should install the container-selinux and below two are dependency packages for container-selinux

policycoreutils.2.5-11.el7 Click here to download

policycoreutils-python (This will be available in your OS packages list)

Now again try to install the docker-ee using yum.

Start the docker using systemctl.

[root@localhost ~]# systemctl start docker

Now we completed docker-ee installation.

To verify Docker-EE installed correctly, use the hello-world image. This will download a test image and run it in a container. Will give you the information.

[root@localhost ~]# docker run hello-world
Unable to find image 'hello-world:latest' locally
latest: Pulling from library/hello-world
9bb5a5d4561a: Pull complete
Digest: sha256:f5233545e43561214ca4891fd1157e1c3c563316ed8e237750d59bde73361e77
Status: Downloaded newer image for hello-world:latest

Hello from Docker!
This message shows that your installation appears to be working correctly.

To generate this message, Docker took the following steps:
1. The Docker client contacted the Docker daemon.
2. The Docker daemon pulled the "hello-world" image from the Docker Hub.
(amd64)
3. The Docker daemon created a new container from that image which runs the
executable that produces the output you are currently reading.
4. The Docker daemon streamed that output to the Docker client, which sent it
to your terminal.

To try something more ambitious, you can run an Ubuntu container with:
$ docker run -it ubuntu bash

Share images, automate workflows, and more with a free Docker ID:
https://hub.docker.com/

For more examples and ideas, visit:
https://docs.docker.com/engine/userguide/


So, Finally we completed the Docker installation.

Refernce: docs.docker.com

List of tools in Kali Linux

List of tools in Kali Linux

We have more than 500 List of tools in Kali Linux and below are the categories of available tools with numbers.

List of tools in Kali Linux:
  1. Exploitation tools (21)
  2. Forensics (23)
  3. Hardware hacking (6)
  4. Information Gathering (69)
  5. Maintaining Access (18)
  6. Password Attacks (41)
  7. Reporting Tools (10)
  8. Reverse Engineering (11)
  9. Sniffing/ Spoofing (32)
  10. Stress testing (14)
  11. Uncategorized (10)
  12. Vulnerability Analysis (29)
  13. Web Applications (44)
  14. Wireless Attacks (53)

Will see briefly in future posts about these categorized tools.

Thanks for your support. Comments are always welcome to provide you the better experience on learning technologies.

Reference: Kali Docs