Docker push – Error – requested access to the resource is denied

Docker push – Error – requested access to the resource is denied

exact error:  Error: writing blob: initiating layer upload to /v2/shaikabuthagirs/myrepo/blobs/uploads/ in registry-1.docker.io: requested access to the resource is denied

Cause:

While i’m using simply below command to establish connection with hub.docker.com, it is connecting with some other repository instead of docker.io

#docker login

because of the, we are getting above error while trying to push image from server to hub.docker.com

Solution:

We need to login to docker.io repository to fix this issue. So for that we need to mention the repository as well along with #docker login command like below

[ec2-user@ip-172-31-40-126 ~]$ docker login -u shaikabuthagirs -p "Thagir@56" docker.io
Emulate Docker CLI using podman. Create /etc/containers/nodocker to quiet msg.
Login Succeeded!

Now create tag before pushing it to hub and below is the command

[ec2-user@ip-172-31-40-126 nginx]$ docker images
Emulate Docker CLI using podman. Create /etc/containers/nodocker to quiet msg.
REPOSITORY TAG IMAGE ID CREATED SIZE
localhost/mynginx latest 136dabf8f70c 17 minutes ago 196 MB

#docker tag mynginx:latest shaikabuthagirs/nginx:v1

mynginx :latest  ->  my customized image: tag name(This can be like versioning and you can name it as per your own requirement)

shaikabuthagirs/nginx:v1  ->  shaikabuthagirs(My docker hub account name)/nginx(repository which I created in my account):v1(tag name. As I said im using here as version 1)

After tag creation i’m listing images again

[ec2-user@ip-172-31-40-126 nginx]$ docker images
Emulate Docker CLI using podman. Create /etc/containers/nodocker to quiet msg.
REPOSITORY TAG IMAGE ID CREATED SIZE
localhost/shaikabuthagirs/nginx v1 136dabf8f70c 19 minutes ago 196 MB
localhost/mynginx latest 136dabf8f70c 19 minutes ago 196 MB

You can see the tagged image showing now and now we can push it to docker hub using below command

[ec2-user@ip-172-31-40-126 nginx]$ docker push shaikabuthagirs/nginx:v1
Emulate Docker CLI using podman. Create /etc/containers/nodocker to quiet msg.
Getting image source signatures
Copying blob bd98674871f5 skipped: already exists
Copying blob 2b99b9c5d9e5 skipped: already exists
Copying blob 1e109dd2a0d7 skipped: already exists
Copying blob ec04bab23527 skipped: already exists
Copying blob 566e42bcee1c skipped: already exists
Copying blob da8cc133ff82 skipped: already exists
Copying blob 7753612990f4 done |
Copying blob c44f27309ea1 skipped: already exists
Copying config 136dabf8f7 done |
Writing manifest to image destination
[ec2-user@ip-172-31-40-126 nginx]$

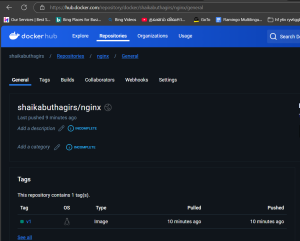
Now the image has been pushed into the hub.docker.com and see the below screenshot after the push

push-image-hub.docker.com

Thanks for reading the post and looking for your support always!


Installing Docker on RHEL/ CentOS 8

Docker is a tool that uses kernel modules like namespace and cgroups to run container over single OS Instance.

It provides lightweight and efficient environment to deploy and manage applications by creating containers.

We are going to see Installing docker on RHEL/ CentOS 8 in this post

Installing Docker on RHEL/ CentOS 8

Docker available in below two types:

Docker EE(Enterprise Edition)
Docker CE(Community Edition)

Pre-Requisites:

Uninstall the old version of Docker using below command

yum  -y remove  docker-common docker container-selinux docker-selinux docker-engine

Your existing containers will be remain under /var/lib/docker

Installing dependent packages:
# yum -y install lvm2 device-mapper device-mapper-persis                                                                                        tent-data device-mapper-event device-mapper-libs device-mapper-event-libs
Adding Docker Repository:

Docker Inc still didnt replease Docker for RHEL8/ CentOS 8. So, we can use alternate one which is used for RHEL7/ CentOS7

# curl https://download.docker.com/linux/centos/docker-ce.repo -o /etc/yum.repos.d/docker-ce.repo
% Total % Received % Xferd Average Speed Time Time Time Current
Dload Upload Total Spent Left Speed
100 2424 100 2424 0 0 22238 0 --:--:-- --:--:-- --:--:-- 22238

Docker community edition requires container.io => 1.2.2.3. But, its not available for RHEL/ CentOS 8. So, we need to skip and proceed the the docker installation in our own RISK.

# yum install docker-ce
Docker CE Stable - x86_64 16 kB/s | 21 kB 00:01
Error:
Problem: package docker-ce-3:19.03.5-3.el7.x86_64 requires containerd.io >= 1.2.2-3, but none of the providers can be installed

cannot install the best candidate for the job
package containerd.io-1.2.10-3.2.el7.x86_64 is excluded
package containerd.io-1.2.2-3.3.el7.x86_64 is excluded
package containerd.io-1.2.2-3.el7.x86_64 is excluded
package containerd.io-1.2.4-3.1.el7.x86_64 is excluded
package containerd.io-1.2.5-3.1.el7.x86_64 is excluded
package containerd.io-1.2.6-3.3.el7.x86_64 is excluded
(try to add '--skip-broken' to skip uninstallable packages or '--nobest' to use not only best candidate packages)
Installing docker by skipping unavailable packages
[root@ip-172-31-44-32 ~]# yum -y install docker-ce --nobest
Output:
Installed:
docker-ce-3:18.09.1-3.el7.x86_64 containerd.io-1.2.0-3.el7.x86_64 docker-ce-cli-1:19.03.5-3.el7.x86_64
container-selinux-2:2.94-1.git1e99f1d.module+el8.0.0+4017+bbba319f.noarch libnftnl-1.1.1-4.el8.x86_64 libcgroup-0.41-19.el8.x86_64
policycoreutils-python-utils-2.8-16.1.el8.noarch libnfnetlink-1.0.1-13.el8.x86_64 libnetfilter_conntrack-1.0.6-5.el8.x86_64
iptables-1.8.2-9.el8_0.1.x86_64


Skipped:
docker-ce-3:19.03.5-3.el7.x86_64


Complete!

Now Docker Version “3:18.09.1-3.el7.x86_64” has been installed.S

Start and enable the Docker service by using below command
# systemctl start docker

# systemctl enable docker
Created symlink /etc/systemd/system/multi-user.target.wants/docker.service â /usr/lib/systemd/system/docker.service.
Check the docker service status
# systemctl status docker
â docker.service - Docker Application Container Engine
Loaded: loaded (/usr/lib/systemd/system/docker.service; enabled; vendor preset: disabled)
Active: active (running) since Fri 2020-01-17 05:37:17 UTC; 2min 4s ago
Docs: https://docs.docker.com
Main PID: 15635 (dockerd)
Tasks: 18
Memory: 53.5M
CGroup: /system.slice/docker.service
ââ15635 /usr/bin/dockerd -H fd://
ââ15649 containerd --config /var/run/docker/containerd/containerd.toml --log-level info
Jan 17 05:37:17 ip-172-31-44-32.us-east-2.compute.internal dockerd[15635]: time="2020-01-17T05:37:17.341886251Z" level=info msg="Graph migration to content-addressabil>
Jan 17 05:37:17 ip-172-31-44-32.us-east-2.compute.internal dockerd[15635]: time="2020-01-17T05:37:17.342289173Z" level=warning msg="Your kernel does not support cgroup>
Jan 17 05:37:17 ip-172-31-44-32.us-east-2.compute.internal dockerd[15635]: time="2020-01-17T05:37:17.342309354Z" level=warning msg="Your kernel does not support cgroup>
Jan 17 05:37:17 ip-172-31-44-32.us-east-2.compute.internal dockerd[15635]: time="2020-01-17T05:37:17.342708097Z" level=info msg="Loading containers: start."
Jan 17 05:37:17 ip-172-31-44-32.us-east-2.compute.internal dockerd[15635]: time="2020-01-17T05:37:17.556082824Z" level=info msg="Default bridge (docker0) is assigned w>
Jan 17 05:37:17 ip-172-31-44-32.us-east-2.compute.internal dockerd[15635]: time="2020-01-17T05:37:17.654816733Z" level=info msg="Loading containers: done."
Jan 17 05:37:17 ip-172-31-44-32.us-east-2.compute.internal dockerd[15635]: time="2020-01-17T05:37:17.681089736Z" level=info msg="Docker daemon" commit=4c52b90 graphdri>
Jan 17 05:37:17 ip-172-31-44-32.us-east-2.compute.internal dockerd[15635]: time="2020-01-17T05:37:17.681241065Z" level=info msg="Daemon has completed initialization"
Jan 17 05:37:17 ip-172-31-44-32.us-east-2.compute.internal dockerd[15635]: time="2020-01-17T05:37:17.717122644Z" level=info msg="API listen on /var/run/docker.sock"
Jan 17 05:37:17 ip-172-31-44-32.us-east-2.compute.internal systemd[1]: Started Docker Application Container Engine.

Now check the Docker installation by running a container using anyone the base image

# docker run -it hello-world
Unable to find image 'hello-world:latest' locally
latest: Pulling from library/hello-world
1b930d010525: Pull complete
Digest: sha256:9572f7cdcee8591948c2963463447a53466950b3fc15a247fcad1917ca215a2f
Status: Downloaded newer image for hello-world:latest

Hello from Docker!
This message shows that your installation appears to be working correctly.

To generate this message, Docker took the following steps:
The Docker client contacted the Docker daemon.
The Docker daemon pulled the "hello-world" image from the Docker Hub.
(amd64)
The Docker daemon created a new container from that image which runs the
executable that produces the output you are currently reading.
The Docker daemon streamed that output to the Docker client, which sent it
to your terminal.

To try something more ambitious, you can run an Ubuntu container with:
$ docker run -it ubuntu bash

Share images, automate workflows, and more with a free Docker ID:
https://hub.docker.com/

For more examples and ideas, visit:
https://docs.docker.com/get-started/

Allowing non root users:

Check whether group called “Docker” availavle or not

# cat /etc/group | grep docker
docker:x:989:

Since group already exists, Now create a new user

# useradd abu

Check created users details like default UID, GID/ Groups added

# id abu
uid=1001(abu) gid=1001(abu) groups=1001(abu)

Now add “abu” user to “Docker” group as another group.

# usermod -aG docker abu

# id abu
uid=1001(abu) gid=1001(abu) groups=1001(abu),989(docker)

Now we can use this user to run docker instead if using root user.

Setup Docker Repository

Before installing the Docker Engine on your host, you need to setup the repository first. So, will see How to setup Docker Repository in this post.
After that, you can Install/Update the Docker from the repository.

Setup Docker Repository

Setup Docker Repository:

  1. Yum should be configured on your host. Please use this post to know How to configure yum repository
  2. Than, Packages required: yum-utils, yum-config-manager and device-mapper-persistent-data, lvm2 are required for devicemapper
    Storage driver.
  3. use below command to to install above mentioned packages using yum
#yum install -y yum-utils device-mapper-persistent-data lvm2

Since the packages are already installed on my host, Update has been done

Updated:
device-mapper-persistent-data.x86_64 0:0.8.5-1.el7 lvm2.x86_64 7:2.02.185-2.el7_7.2

Use the below command to setup Docker Repository

#yum-config-manager --add-repo https://download.docker.com/linux/centos/docker-ce.repo
Loaded plugins: fastestmirror
adding repo from: https://download.docker.com/linux/centos/docker-ce.repo
grabbing file https://download.docker.com/linux/centos/docker-ce.repo to /etc/yum.repos.d/docker-ce.repo
repo saved to /etc/yum.repos.d/docker-ce.repo

And check whether the repository added or not by issuing below command

#yum repolist | grep Docker
docker-ce-stable/x86_64 Docker CE Stable - x86_64 63

Installing Docker Engine:

To confirm the successful completion of Repository setup, will try to install New version of Docker engine now using below command.

#yum install docker-ce docker-ce-cli containerd.io 

Installed:
containerd.io.x86_64 0:1.2.10-3.2.el7 docker-ce.x86_64 3:19.03.5-3.el7 docker-ce-cli.x86_64 1:19.03.5-3.el7

Dependency Installed:
container-selinux.noarch 2:2.107-3.el7 libseccomp.x86_64 0:2.3.1-3.el7


Now start the Docker Engine:

# systemctl start docker

# systemctl status docker
● docker.service - Docker Application Container Engine
Loaded: loaded (/usr/lib/systemd/system/docker.service; disabled; vendor preset: disabled)
Active: active (running) since Thu 2020-01-02 02:14:11 EST; 8s ago
Docs: https://docs.docker.com
Main PID: 60692 (dockerd)
Memory: 37.6M
CGroup: /system.slice/docker.service
└─60692 /usr/bin/dockerd -H fd:// --containerd=/run/containerd/containerd.sock

Jan 02 02:14:10 localhost dockerd[60692]: time="2020-01-02T02:14:10.667134175-05:00" level=info msg="ccResolverWrapper: sending update to cc: {[{unix:/…odule=grpc
Jan 02 02:14:10 localhost dockerd[60692]: time="2020-01-02T02:14:10.667153441-05:00" level=info msg="ClientConn switching balancer to \"pick_first\"" module=grpc
Jan 02 02:14:10 localhost dockerd[60692]: time="2020-01-02T02:14:10.695465002-05:00" level=info msg="Loading containers: start."
Jan 02 02:14:10 localhost dockerd[60692]: time="2020-01-02T02:14:10.952900918-05:00" level=info msg="Default bridge (docker0) is assigned with an IP ad…P address"
Jan 02 02:14:11 localhost dockerd[60692]: time="2020-01-02T02:14:11.018716067-05:00" level=info msg="Loading containers: done."
Jan 02 02:14:11 localhost dockerd[60692]: time="2020-01-02T02:14:11.040693143-05:00" level=warning msg="Not using native diff for overlay2, this may ca…r=overlay2
Jan 02 02:14:11 localhost dockerd[60692]: time="2020-01-02T02:14:11.041056334-05:00" level=info msg="Docker daemon" commit=633a0ea graphdriver(s)=overl…on=19.03.5
Jan 02 02:14:11 localhost dockerd[60692]: time="2020-01-02T02:14:11.041178502-05:00" level=info msg="Daemon has completed initialization"
Jan 02 02:14:11 localhost dockerd[60692]: time="2020-01-02T02:14:11.072808771-05:00" level=info msg="API listen on /var/run/docker.sock"
Jan 02 02:14:11 localhost systemd[1]: Started Docker Application Container Engine.
Hint: Some lines were ellipsized, use -l to show in full.

Now verify the Docker using below command

# docker run hello-world
Unable to find image 'hello-world:latest' locally
latest: Pulling from library/hello-world
1b930d010525: Pull complete
Digest: sha256:4fe721ccc2e8dc7362278a29dc660d833570ec2682f4e4194f4ee23e415e1064
Status: Downloaded newer image for hello-world:latest


Hello from Docker!
This message shows that your installation appears to be working correctly.


To generate this message, Docker took the following steps:
1. The Docker client contacted the Docker daemon.
2. The Docker daemon pulled the "hello-world" image from the Docker Hub.
(amd64)
3. The Docker daemon created a new container from that image which runs the
executable that produces the output you are currently reading.
4. The Docker daemon streamed that output to the Docker client, which sent it
to your terminal.


To try something more ambitious, you can run an Ubuntu container with:
$ docker run -it ubuntu bash


Share images, automate workflows, and more with a free Docker ID:
https://hub.docker.com/


For more examples and ideas, visit:
https://docs.docker.com/get-started/

Thanks for reading this post and going forward will talk about Docker Engine more…

Reference: Docker Docs

How to install Docker EE in RHEL7

How to install Docker EE in RHEL7

Will see How to install Docker EE in RHEL7 in this post. We have other steps as well on our blog to install the Docker in Linux.

It’s a container virtualization technology and more efficient in the deploy an application.

We have two option to install the Docker EE in RedHat Linux.

  1. Yum Repository: Create/ Enable YUM Repository and install using that. this is the recommended one to install/ upgrade a package in Linux.
  2. RPM: We have to download and install manually. This will be useful to install when the system doesn’t have internet access.

Requirement:

RHEL 7.1 or Higher Operating System.

overlay2 or device-mapper storage driver(direct-lvm mode for production environment)

Yum repository.

Disable SELinux in IBM Power Systems before install/ Upgrade

Enabling YUM Repository for Docker EE Installation:

Browse “https://store.docker.com/my-content” and login. You should at least registered for the trail.

Once logged in, Click “Setup” to get the URL to enable the repository.

Copy the URL from “Copy and paste this URL to download your Edition:” and save it for later use.

You will use this URL to create the variable called “DOCKERURL“.

Use the below command to remove existing docker repo.

[root@localhost ~]# rm /etc/yum.repos.d/docker*.repo

Save the copied URL in the environmental variable(DOCKERURL). Replace with URL where “<DOCKER-URL>” is mentioned in below command.

#export DOCKERURL="<DOCKER-EE-URL>"

Than now store the variable(DOCKERURL) in yum variable /etc/yum/vars

[root@localhost ~]# sudo -E sh -c 'echo "$DOCKERURL/rhel" > /etc/yum/vars/dockerurl'

Now store the OS version in /etc/yum/vars/dockerosversion:

[root@localhost ~]# sh -c 'echo "7.3" > /etc/yum/vars/dockerosversion'

Then install the required packages yum-utils, device-mapper-persistent-data and lvm2

[root@localhost ~]# yum -y install yum-utils device-mapper-persistent-data lvm2

Now will enable extras RHEL repository and This will ensure the access to container-selinux which is package required by “Docker-EE” and the below command will be used in all Architecture except IBM Power Systems.

[root@localhost ~]# yum-config-manager --enable rhel-7-server-extras-rpms
Loaded plugins: product-id

For IBM Power System use the below command:

#yum-config-manager --enable extras
#subscription-manager repos --enable=rhel-7-for-power-le-extras-rpms
#yum makecache fast
#yum -y install container-selinux

Add the Docker EE repository using below command.

[root@localhost ~]# yum-config-manager --add-repo "$DOCKERURL/rhel/docker-ee.repo"

Installing Docker EE in RedHat Linux:

Now using the docker repository will install the Docker-EE by executing below command.

[root@localhost ~]# yum install docker-ee

Note: If the above command failed for “container-selinux” dependency. Then we should install the container-selinux and below two are dependency packages for container-selinux

policycoreutils.2.5-11.el7 Click here to download

policycoreutils-python (This will be available in your OS packages list)

Now again try to install the docker-ee using yum.

Start the docker using systemctl.

[root@localhost ~]# systemctl start docker

Now we completed docker-ee installation.

To verify Docker-EE installed correctly, use the hello-world image. This will download a test image and run it in a container. Will give you the information.

[root@localhost ~]# docker run hello-world
Unable to find image 'hello-world:latest' locally
latest: Pulling from library/hello-world
9bb5a5d4561a: Pull complete
Digest: sha256:f5233545e43561214ca4891fd1157e1c3c563316ed8e237750d59bde73361e77
Status: Downloaded newer image for hello-world:latest

Hello from Docker!
This message shows that your installation appears to be working correctly.

To generate this message, Docker took the following steps:
1. The Docker client contacted the Docker daemon.
2. The Docker daemon pulled the "hello-world" image from the Docker Hub.
(amd64)
3. The Docker daemon created a new container from that image which runs the
executable that produces the output you are currently reading.
4. The Docker daemon streamed that output to the Docker client, which sent it
to your terminal.

To try something more ambitious, you can run an Ubuntu container with:
$ docker run -it ubuntu bash

Share images, automate workflows, and more with a free Docker ID:
https://hub.docker.com/

For more examples and ideas, visit:
https://docs.docker.com/engine/userguide/


So, Finally we completed the Docker installation.

Refernce: docs.docker.com