How to install RHEL 8

We are going to learn how to install RHEL 8 Operating system in this post. It supports “Appliction Stream” which will allow developer tools and read our previous post to know more about RHEL 8 features.

Minimum System Requirements:

  • 4 GB RAM
  • 20 GB unallocated disk space
  • 64-bit x86 or ARM System

and it will supports below architecture,

  • AMD or Intel x86 64-bit
  • 64-bit ARM
  • IBM Power Systems, Little Endian & IBM Z

Keep the RHEL 8 Media or Image file ready to start the installation. Use the below link to download RHEL 8

https://access.redhat.com/downloads/

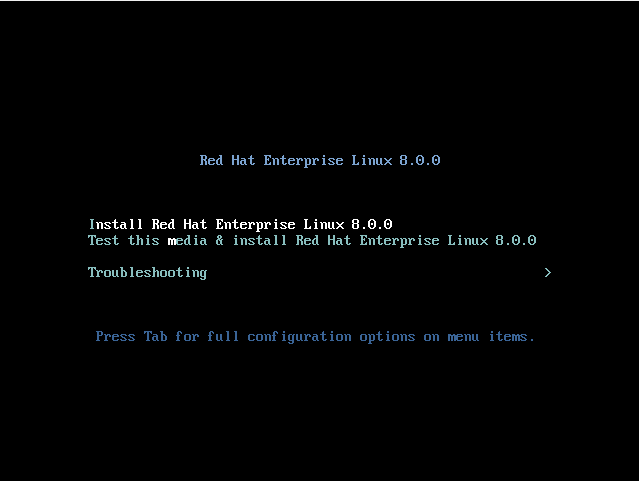
Boot the system using RHEL 8 media or image file and it will start the installation like below and by using “Tab” select “RedHat Enterprise Linux 8.0.0″and press “Enter” key in keyboard to start the installation.

How to install RHEL 8

On next screen, you will get a list that is asking you to select the System language and keyboard layout like below. Select your preferred language and click on continue

How to install RHEL 8

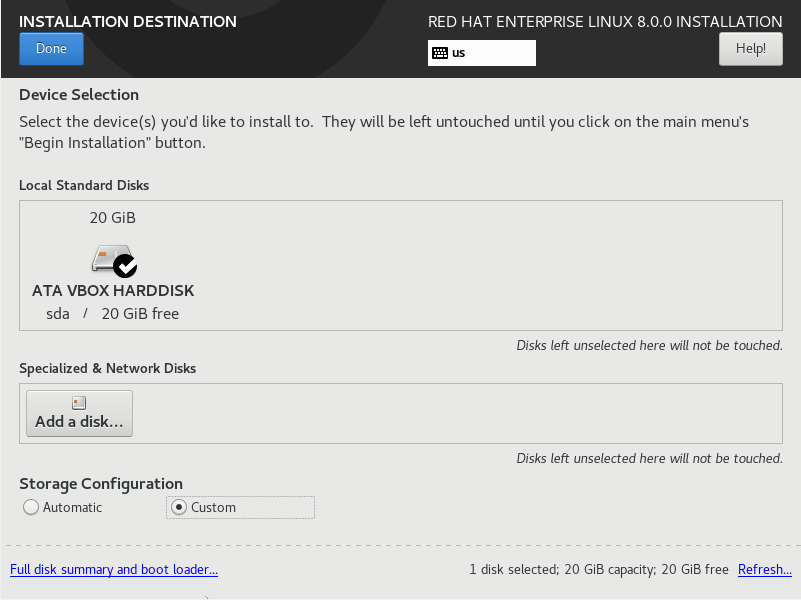
Then next you will get a screen which is the place to provide all information to install the operating system. Click on “Installation Destination” for partitioning.

How to install RHEL 8

In next screen, select “Automatic” for auto partitioning, which is done by Operating System itself. In this option i will take all the available disk for installation

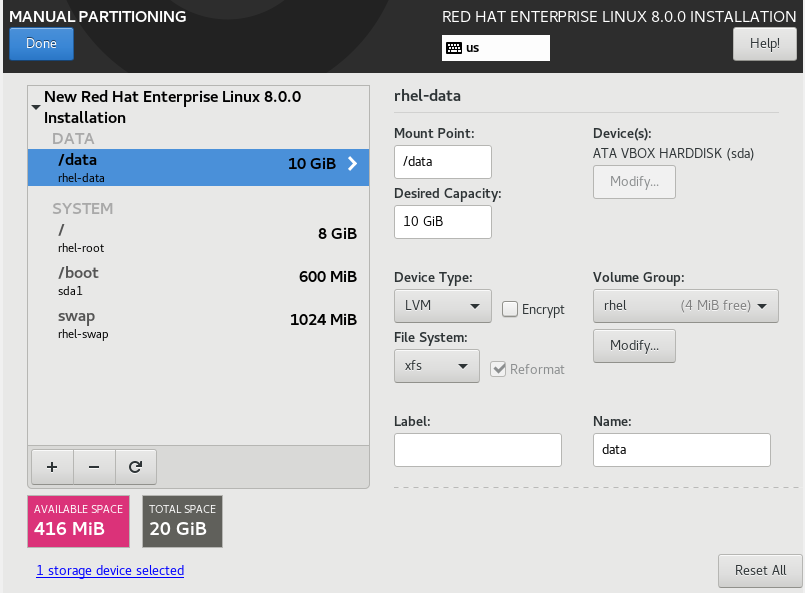
Select “Custom” to do partitioning by yourself. Here you need to select the required mount points and size concern to that mounts. Default mount points will be /(root), swap, /boot. See the below screenshots of custom partitioning which i done in this installation.

How to install RHEL 8

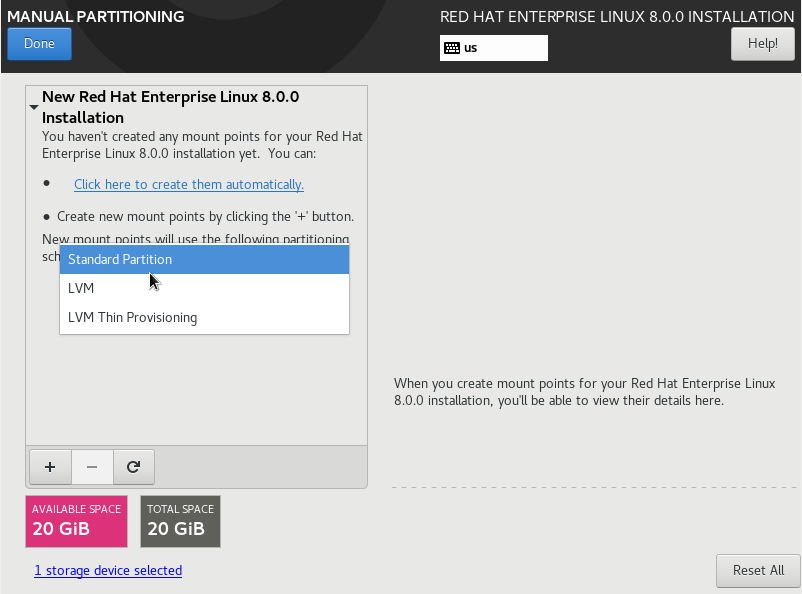
Select the partition type “Standard Partition, LVM, LVM Thin Provisioning” which type you want to create partition. Here i selected LVM type for this installation. LVM is best option where you can extend or reduce the partition size whenever needed.

How to install RHEL 8

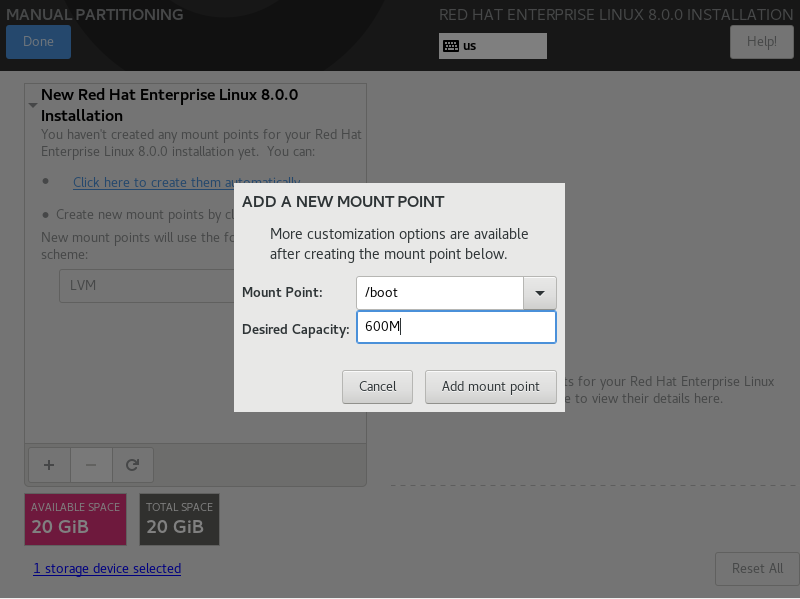
Select Filesystem(partition) and provide size of the filesystem like below

How to install RHEL 8

Finally i have created few of the filesystems using available disk space with LVM. Click on done from the top left side of the screen.

How to install RHEL 8

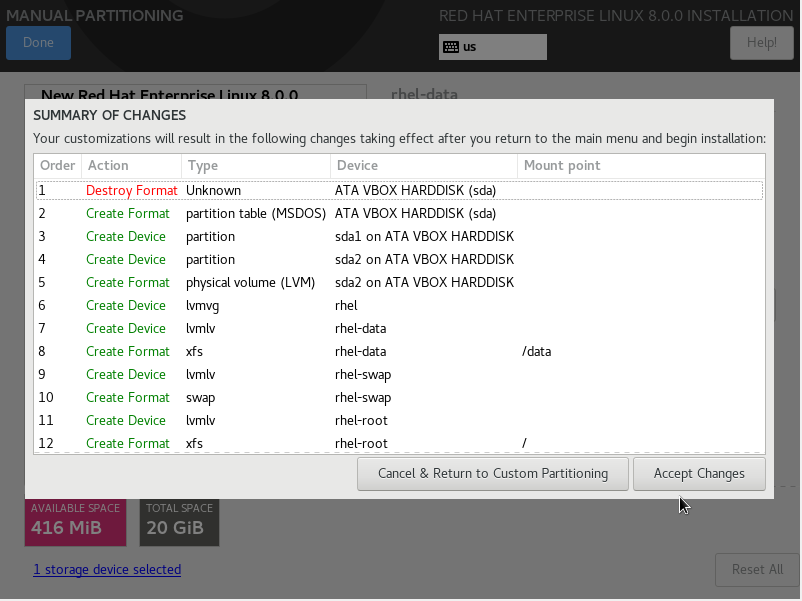
Next screen it will ask for the confirmation to make changes in disk. So, Click on “Accept Changes” to proceed further.

How to install RHEL 8

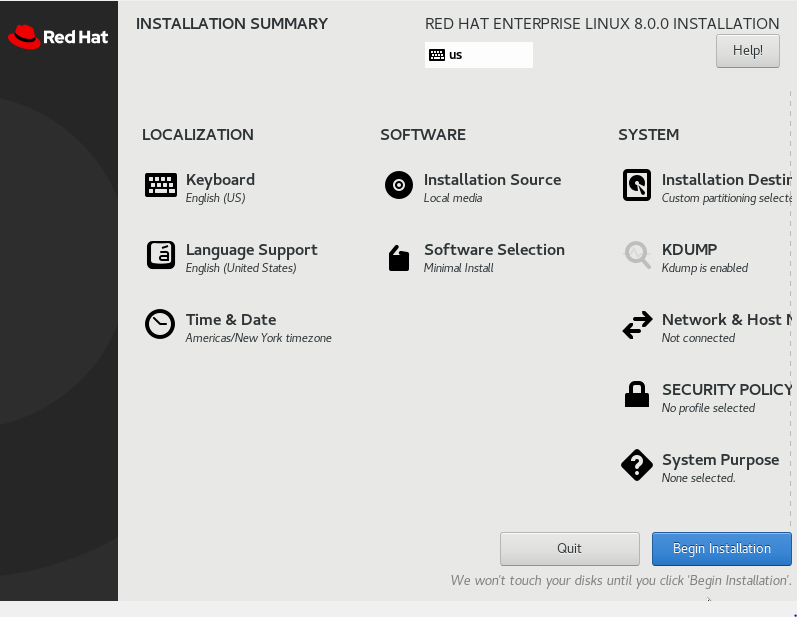
Next you can see a window where you can select the Language, Date and time, Time zone, network settings, Installation source, Installation Destination and Software selection.

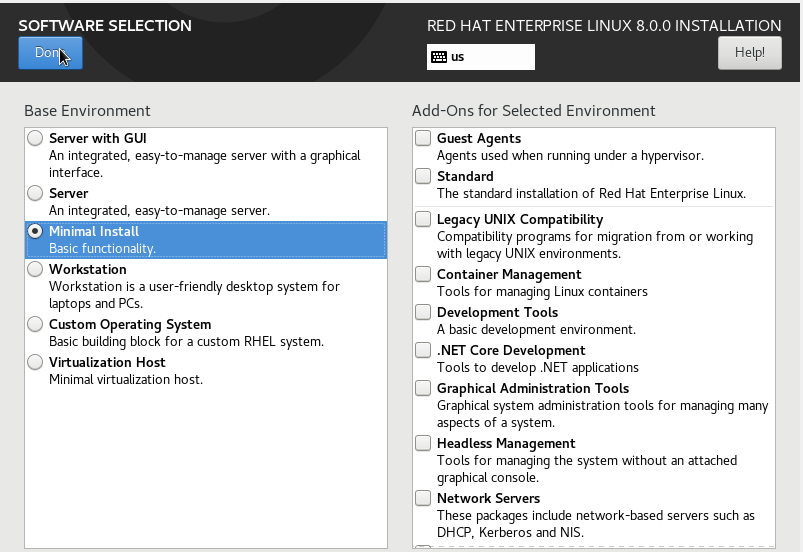
Click on “software selection”

How to install RHEL 8

You will find a screen like below. From that you can select the option based on you Configuration, for what you are going to use this server. I used “Minimal Install”. Click on Done from the top left side corner of the screen and again click “Begin Installation”.

How to install RHEL 8

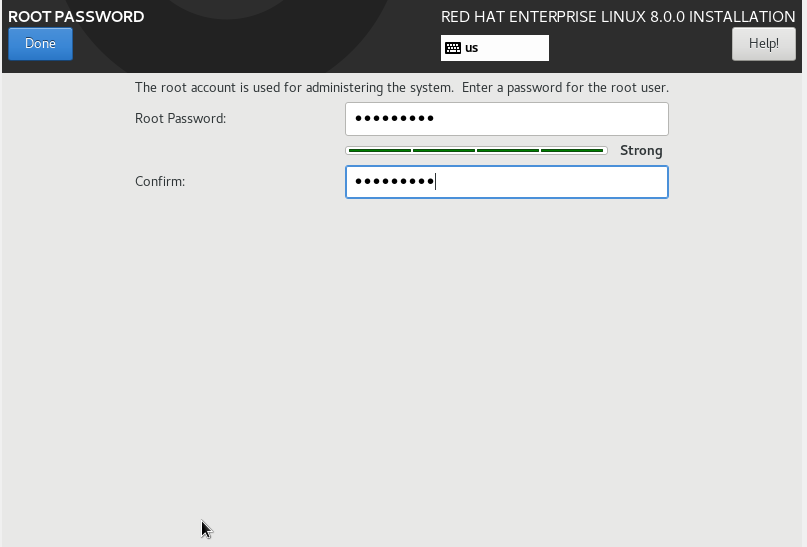
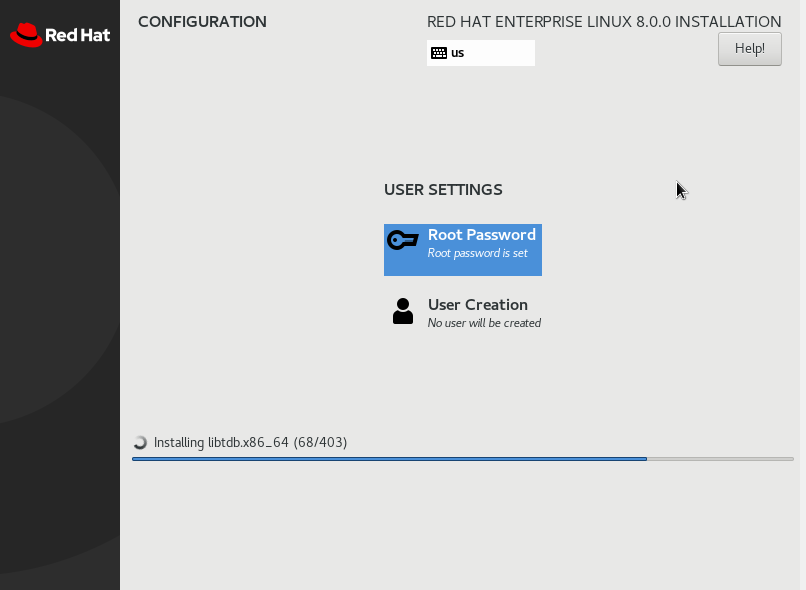
Now it will start the installation and the same time it will show you the option to set password for root user and if you want to create any other user, you can create and click “Done”

How to install RHEL 8

After the Installation click on “Reboot” from the bottom right side corner of the screen and finally system will boot up with new operating system installed and prompt for username and password.

How to install RHEL 8

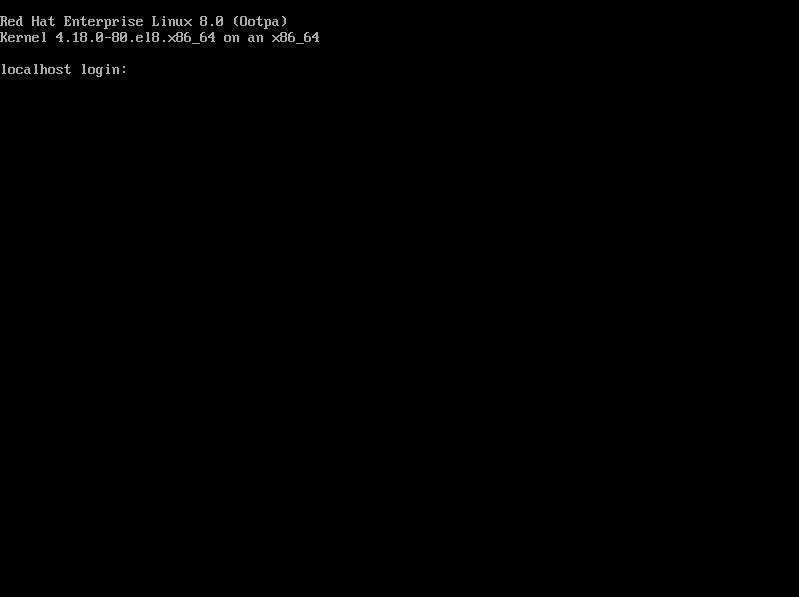
Now your system is ready for production.

Thanks for reading this post.

Reference: RedHat Documentation

RedHat Enterprise Linux 8 (RHEL 8) released


RedHat Enterprise Linux 8 (RHEL 8) released

RedHat Enterprise Linux 8 (RHEL 8) released on 7th May 2019 and another important thing is that this happened after acquisition of RedHat by IBM on 28th October 2018.

Release Date:

RHEL 8 released on 7th May 2019 and now its available for production environment.

RHEL 8 Download link:

RedHat Enterprise Linux 8 (RHEL 8) released

Architecture:

AMD64, Intel 64-bit, 64-bit ARM, IBM Power Systems, and IBM Z 

Overview:

RHEL 8 uses upstream Linux kernel 4.18

This is Secure, Stable and good foundation for hybrid cloud deployments.

New Features:

It Supports 4PB Physical memory

Wayland is default display server, instead of Xorg.

XFS supports shared copy-on-write data extends.

Now cockpit is default package and it comes along with RedHat OS image

RHEL 8 distributed with two main repositories: BaseOS & AppStream

RHEL 8 comes with new version of yum which is based on DNF.

nftables replaces iptables in network framework and we can convert existing iptables rules to nftables format for use.

Nginx 1.14 available in default repository.

Now in RHEL 8 sosreport can report any load of eBPF (extended Berkeley Packet Filtering) programs and maps

Geoliet2 database replaces geolite

In Cluster part we have new pcs commands to list and test available watchdog devices.

In the next post will see how to install RHEL 8

Reference: RedHat access portal

How to Register and Enable RedHat Subscriptions, Repositories for RHEL7

How to Register and Enable RedHat Subscriptions, Repositories for RHEL7

This post will guide you to know How to Register and Enable RedHat Subscriptions, Repositories for RHEL7 before system full upgrade or to install any packages from EPEL Repository in RedHat.

Enabling RedHat repositories are mandatory to install any packages using yum. RedHat subscription has the registered system details once the registration has been done.

Requierment:

All we need is newly installed system with RedHat 7.

Registering and Activating RedHat Subscrition:

As a first step we should go to the RedHat Customer portal and register there. After the successful registration do remember the credentials.

Now login to the RHEL7 server and use the below command to register your system to RedHat Customer portal with RedHat credentials which you created just before

#subscription-manager register --username <username> --password <password>

Once register your system, use the “list” option to get the all available subscription and than note down the subscription pool id which you need to activate it.

#subscription-manager list -available

if your not getting any list, than your system registration with RedHat customer portal is not purchased for subscription. Please get in touch with RedHat to proceed further.

Once you got the list of available subscription, you can use the below command to activate the subscription

#subscription-manager subscribe --pool=Pool ID number

To know the status of consumed subscription use the below command

#subscription-manager list –consumed

To list the available subscription use the below command

#subscription-manager list

Once your system registered with RedHat customer portal and activated subscription, you can enable the repositories . Use the below command to list the repositories for you subscription.

#subscription-manager repos --list

use the below command to list the available repository

#yum repolist all

To enable a specific repository, open “vi /etc/yum.repos.d/redhat.repo” file and ensure that “enbaled=1” for concern repository which you want to enable

Now list only enabled repository by executing below command

#yum repolist

Now you can use required yum commands to update your system/ install any packages like below

#yum update
#yum install <package_name>

Reference: RedHat portal

How to install Nagios Core server 4.4.3 on RHEL 6/7 & CentOS 6/7

This post will help you to know How to install Nagios Core server 4.4.3 on RHEL 6/7 & CentOS 6/7.

Nagios is a powerful monitoring tool. It will help to monitor a infrastructure.

It will monitor applications, service and entire infrastructure.

Required Packages:

  1. httpd
  2. php
  3. php-cli
  4. gcc
  5. unzip
  6. wget
  7. glibc
  8. glibc-common
  9. gd
  10. gd-devel
  11. net-snmp
[root@nagiosrv ~]yum install httpd php php-cli gcc unzip wget glibc glibc-common gd gd-devel net-snmp

As we have installed httpd and this will be useful when we access the Nagios core to manage through web console.

 [root@nagiosrv yumrepo]# systemctl start httpd 

Now create Nagios user account using below command:

[root@nagiosrv yumrepo]# useradd Nagios
[root@nagiosrv yumrepo]# passwd nagios
Changing password for user nagios.
New password:
BAD PASSWORD: The password contains the user name in some form
Retype new password:
passwd: all authentication tokens updated successfully.

Now we need to create a group “nagcmd” to setup Nagios and then add the users “nagios” & “apache”   to be a part of group: nagcmd

[root@nagiosrv yumrepo]# groupadd nagcmd
[root@nagiosrv yumrepo]# usermod -a -G nagcmd nagios
[root@nagiosrv yumrepo]# usermod -a -G nagcmd apache

Ñow its time to start Nagios Core server installation

Since Nagios third party tool, we need to download first for installation using below commands:

[root@nagiosrv ~]# cd /opt
[root@nagiosrv opt]# wget https://assets.nagios.com/downloads/nagioscore/releases/nagios-4.4.3.tar.gz
[root@nagiosrv opt]# tar -xvf nagios-4.4.3.tar.gz
[root@nagiosrv nagios-4.4.3]# ./configure --with-command-group=nagcmd
[root@nagiosrv nagios-4.4.3]# make all
[root@nagiosrv nagios-4.4.3]# make install
[root@nagiosrv nagios-4.4.3]# make install-init
[root@nagiosrv nagios-4.4.3]# make install-daemoninit
[root@nagiosrv nagios-4.4.3]# make install-commandmode
[root@nagiosrv nagios-4.4.3]# make install-config
[root@nagiosrv nagios-4.4.3]# make install-exfoliation

Now configure Apache for Nagios installation using below command:

[root@nagiosrv nagios-4.4.3]# make install-webconf

Will configure Apache authentication for nagiosadmin which is default user. Don’t change this username. If you are changing then need to do more changes in configuration file.

[root@nagiosrv nagios-4.4.3]# htpasswd -c /usr/local/nagios/etc/htpasswd.users nagiosadmin

Now restart the apache

[root@nagiosrv nagios-4.4.3]# systemctl restart httpd

As a next step need to install Nagios plugins, once installed Nagios core using below commands:

[root@nagiosrv nagios-4.4.3]# cd /opt
[root@nagiosrv opt]# wget http://nagios-plugins.org/download/nagios-plugins-2.2.1.tar.gz
[root@nagiosrv opt]# tar -xvf nagios-plugins-2.2.1.tar.gz
[root@nagiosrv opt]# cd nagios-plugins-2.2.1

Now install and compile the plugins using below command:

[root@nagiosrv nagios-plugins-2.2.1]# ./configure --with-nagios-user=nagios --with-nagios-group=Nagios
[root@nagiosrv nagios-plugins-2.2.1]# make
[root@nagiosrv nagios-plugins-2.2.1]# make install

We installed Nagios core and plugins. So, now will check and verify the configuration using below command:

[root@nagiosrv nagios-plugins-2.2.1]#
/usr/local/nagios/bin/nagios -v /usr/local/nagios/etc/nagios.cfg

The output should give 0 Errors and 0 Warnings. If you get the same, then will start the Nagios like below

[root@nagiosrv nagios-plugins-2.2.1]# systemctl start
nagios     

Check SELinux mode using below command:

[root@nagiosrv ~]getenforce
Enforcing

If SELinux is in Enforcing mode, Than change it to Permissive mode or disable it like below

[root@nagiosrv ~]# setenforce 0

Now make sure to enable web server permanently in firewall using below command:

[root@nagiosrv ~]# firewall-cmd --permanent
--add-service=http

Execute below command to make affect in firewall changes which we did using our previous command

[root@nagiosrv ~]# firewall-cmd –reload

Finally we have done everything and now will check whether the web console working on not

Enter url like below in your web browser and replace the IP_ADDR with your server ip

http://IP_ADDR/nagios

It will ask for the username and password. Remember that we already created a user name “nagiosadmin”. We can use that to login the console.

How to install Nagios Core server 4.4.3 on RHEL 6/7 & CentOS 6/7

Enter the nagiosadmin credentials and the web console looks like below

How to install Nagios Core server 4.4.3 on RHEL 6/7 & CentOS 6/7

From the left side pan click on “Hosts” and it will show list of hosts which is added for monitoring.
Since, we doesn’t added any host, it will show only localhost, which is Nagios server like below

How to install Nagios Core server 4.4.3 on RHEL 6/7 & CentOS 6/7

Finally we installed and configured Nagios server. Thanks for readin