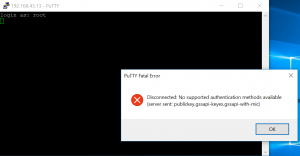
No supported authentication methods available

Error:

Disconnected: No supported authentication methods available (server sent: publickey,gssapi-keyex,gssapi-with-mic)

No supported authentication methods available

Receiving error When trying to access Linux server through putty or other tool using ssh service.

Solution:

  1. Edit /etc/ssh/sshd_config configuration file using vi editor.
        [root@server ~]# vi /etc/ssh/sshd_config
  2. Check and replace with yes for below entry
     PasswordAuthentication no

    changed 

    PasswordAuthentication yes
  3. save and exit from the file using :wq
  4. Than restart the ssh service using below command.
    systemctl restart sshd
  5. Restart the network service using below command.
    systemctl restart network
  6. Now try to access the server and sure it will work. Still if you are facing error in accessing the server, that there might be issue with firewall configuration.

Reference: Super user

Permission handling in Linux

In this post we are going to see(Permission handling in Linux) how to set permission for files and directories in linux/unix.

Before set/unset permission we should check the existing permission for a file usinf ll <filename> command like below.

[root@server ~]# ll abu
-rwxrwxrwx. 1 abu root 113 Dec 11 20:22 abu

We can assign permission based on below categories and same has been display while executing ll or ls –l command.

User:    u

Group:  g

Others:  o

Numeric values used for changing/identifying the permissions:

Read:       4, r

Write:      2, w

Execute:  1, x

Command used for changing file permission:

#Chmod 655 <filename>

Example:

Command to set permission:

We are going to set permission for file abu from 777 to 755 using below command. 755 will have full permission for user, read and execute for group and others.

[root@server ~]# chmod 755 abu
[root@server ~]# ll abu
-rwxr-xr-x. 1 abu root 113 Dec 11 20:22 abu

Also will set the permissions usings characters like below.

Read:        r

Write:       w

Execute:  x

Example:

Command to set permission using characters:

In the below example going to set execute permission alone to others

[root@server ~]# ll abu1
-rwxr-xr--. 1 root abu 0 Dec 11 20:17 abu1
[root@server ~]# chmod o+x abu1
[root@server ~]# ll abu1
-rwxr-xr-x. 1 root abu 0 Dec 11 20:17 abu1

Changing ownership of a file or directory:

#Chwon user:group <filename>

example:

In below example going to change owner of the directory as lbcuser for lbc directory. User has been created already.

Note: Existing owner and group will be root.

before changing owhership:

[root@server ~]# mkdir lbc
[root@server ~]# ll | grep lbc
drwxr-xr-x. 2 root root 6 Dec 16 20:33 lbc

after changing ownership:

[root@server ~]# chown lbcuser lbc
[root@server ~]# ll | grep lbc
drwxr-xr-x. 2 lbcuser root 6 Dec 16 20:33 lbc

using chown command will change group as well like below.

Going to change group as finance.

[root@server ~]# chown :finance lbc
[root@server ~]# ll | grep lbc
drwxr-xr-x. 2 lbcuser finance 6 Dec 16 20:33 lbc

Will change the group alone using chgrp command:

[root@server ~]# mkdir lbc1
[root@server ~]# chgrp finance lbc1
[root@server ~]# ll | grep lbc1
drwxr-xr-x. 2 root finance 6 Dec 16 20:47 lbc1


Reference: RedHat Document

ACL in RHEL7/Cent OS 7

In this post we are going to securing files and directories using ACL in RHEL7/Cent OS 7.

In this post we are going to see how to secure files and directories using ACL.

As first step need to check kernel compatibility for ACL using below command.

[root@server ~]# grep -i acl /boot/config*
CONFIG_EXT4_FS_POSIX_ACL=y
CONFIG_XFS_POSIX_ACL=y
CONFIG_BTRFS_FS_POSIX_ACL=y
CONFIG_FS_POSIX_ACL=y
CONFIG_GENERIC_ACL=y
CONFIG_TMPFS_POSIX_ACL=y
CONFIG_NFS_V3_ACL=y
CONFIG_NFSD_V2_ACL=y
CONFIG_NFSD_V3_ACL=y
CONFIG_NFS_ACL_SUPPORT=m
CONFIG_CEPH_FS_POSIX_ACL=y
CONFIG_CIFS_ACL=y

Above output will says that this kernel is compatible with ACL access since we could see all are marked as yes POSIX_ACL=y. 

If it is set as N. Than we need to rebuild the kernel.

Next need to install the packages.

Required packages for ACL:

acl

nfs4-acl-tools

libacl

Now install all the above three packages using yum:

Link to see how to configure yum locally click here

[root@server ~]# yum -y install nfs4-acl* acl libacl

Will assign read, write and execute permission to files and directories using ACL and will mention characters ugo/rwx  in commands for permissions respectively.

Now will see a example which will help us to understand clearly.

Create three users and one group respectively like below.

[root@server ~]# useradd lbcuser1
[root@server ~]# useradd lbcuser2
[root@server ~]# useradd lbcuser3
[root@server ~]# groupadd lbcgroup
[root@server ~]# passwd lbcuser1
Changing password for user lbcuser1.
New password:
BAD PASSWORD: The password is a palindrome
Retype new password:
passwd: all authentication tokens updated successfully.

Above screen password has been generated for only lbcuser1.Same like that need to set password for other 2 users.

Now add the lbcgroup group as secondry group for lbcuser1 and lbcuser2 users.

[root@server ~]# usermod -aG lbcgroup lbcuser1
[root@server ~]# usermod -aG lbcgroup lbcuser2

Create a directory and a file inside of that directory to assign and check permissions using acl.

[root@server ~]# mkdir /tmp/data
[root@server ~]# touch /tmp/data/testfile.txt

Now change the group as lbcgroup to the file like below.

[root@server ~]# chown :lbcgroup /tmp/data/testfile.txt
[root@server ~]# ll /tmp/data/testfile.txt
-rw-r--r--. 1 root lbcgroup 0 Dec 15 21:14 /tmp/data/testfile.txt

set the permission 770 using chmod command to the testfile.txt.

Now we can login as lbcuser1 and lbcuser2 and than will try to insert content in testfile.txt.

Sure both users can able to insert content in the file. Because, both users and files group is same(lbcgroup).

[root@server ~]# su lbcuser1
[lbcuser1@server root]$ echo "My name is lbcuser1..." > /tmp/data/testfile.txt
[lbcuser1@server root]$ exit
exit
[root@server ~]# su lbcuser2
[lbcuser2@server root]$ echo "My name is lbcuser2..." > /tmp/data/testfile.txt
[lbcuser2@server root]$ exit
exit
[root@server ~]#

and now will try to insert content as lbcuser3. It will give error. Since, its not the owner and member of lbcgroup for that file.

[root@server ~]# su lbcuser3
[lbcuser3@server root]$ echo "My name is lbcuser3..." > /tmp/data/testfile.txt
bash: /tmp/data/testfile.txt: Permission denied

So, now will provide read and write permission using ACL without adding the lbcuser3 in lbcgroup and will check it again to insert content into the file.

[root@server ~]# setfacl -R -m u:lbcuser3:rw /tmp/data/testfile.txt
[root@server ~]# su lbcuser3
[lbcuser3@server root]$ echo "My name is lbcuser3..." > /tmp/data/testfile.txt
[lbcuser3@server root]$ cat /tmp/data/testfile.txt
My name is lbcuser3...

Since we user single > symbol to redirect the echo command out into the file, its showing our last content which is “My name is lbcuser3…”

To set permission for group will use in above command where we used and groupname where we given username like below.

[root@server ~]# setfacl -R -m g:lbcgroup:rw /tmp/data/testfile.txt

To check the existing ACL permission of a file use getfacl command.

[root@server ~]# getfacl /tmp/data/testfile.txt
getfacl: Removing leading '/' from absolute path names
# file: tmp/data/testfile.txt
# owner: root
# group: lbcgroup
user::rwx
user:lbcuser3:rw-
group::rwx
mask::rwx
other::---

Same like file will set permission to directory as well.

Command to set permission for directory:

below command will help us to set read permission alone for other users which is not owner/group of the directory.

[root@server ~]# setfacl -m d:o:r /tmp/data
[root@server ~]# getfacl /tmp/data
getfacl: Removing leading '/' from absolute path names
# file: tmp/data
# owner: root
# group: root
user::rwx
group::r-x
other::r-x
default:user::rwx
default:group::r-x
default:other::r--
 

User/Group disk quota enabling in Linux/Unix

Now we are going to see how to enable User/Group disk quota enabling in Linux/Unix in this post. Sometimes we might have low space in on local disk. To avoid this will allocate disk size to Users/Groups by enabling and configuring quota in /home directory.

As a first step we should enable quota in Filesystem.

by editing and adding usrquota and grpquota in home directory entry at /etc/fstab file will enable quota.


[root@server ~]# vi /etc/fstab

# /etc/fstab
# Created by anaconda on Fri Nov 24 17:31:25 2017
#
# Accessible filesystems, by reference, are maintained under '/dev/disk'
# See man pages fstab(5), findfs(8), mount(8) and/or blkid(8) for more info
#
/dev/mapper/rhel-root / xfs defaults 0 0
UUID=2f2c635e-e5fb-4c81-823a-855a334ca04c /boot xfs defaults 0 0
/dev/mapper/rhel-swap swap swap defaults 0 0
/dev/rootvg/lv_tmp1 /home xfs defaults,usrquota,grpquota 0 0

save and exit from the file.

Now remount the filesystem using below command.

[root@server ~]# mount -o remount /home

Then check whether the quota has been enabled or not in /home mountpoint.

[root@server ~]# mount | grep /home
 /dev/mapper/rootvg-lv_tmp1 on /home type ext4 (rw,relatime,seclabel,quota,usrquota,grpquota,data=ordered)

Creating database using below command

[root@server ~]# quotacheck -cugv /home

C:     Key to create new quota file

U:     User quota

G:     Group quota

V:     Verbose mode

And now turn on the quota in /home directory using below command

[root@server ~]# quotaon /home

Now will assign quota using edquota command to User/Group

Syntax to create quota on user:

#edquota -u <username>

Syntax to create quota on group:

#edquota -g <groupname>

Will see a example of creating quota on user called abu

[root@server ~]# edquota -u abu

Now the above command will open quota file like below

Disk quotas for user abu (uid 1001):
 Filesystem                 blocks soft hard inodes soft hard
 /dev/mapper/rootvg-lv_tmp1    0   5000 6000   0      0    0

Above data has two quota limits. One is based on blocks and another one based on inode.

For block usage:

Soft:    Soft limit will warn the user if the user exceeds the limit. But, user allowed to write data in home directory till reaching the hard limit. In above example, we have provided 5000KB(nearby 5MB)

hard:    Hard limit will not allow user to write data in home directory once reached hard limit. In above example, we have provided 6000KB(6MB) as hard limit.

Will login and try to create 8MB of file using dd command to check the quota on user.

[root@server ~]# su abu
[abu@server ~]$ dd if=/dev/zero of=bgfile bs=1M count=8
dm-3: warning, user block quota exceeded.
dm-3: write failed, user block limit reached.
dd: error writing ‘bgfile’: Disk quota exceeded
6+0 records in
5+0 records out
6127616 bytes (6.1 MB) copied, 0.00498719 s, 1.2 GB/s

Command to display report on user quota:

[root@server ~]# repquota -as
*** Report for user quotas on device /dev/mapper/rootvg-lv_tmp1
Block grace time: 7days; Inode grace time: 7days
 Space limits File limits
User used soft hard grace used soft hard grace
----------------------------------------------------------------------
root -- 20K 0K 0K 2 0 0
abu +- 6000K 5000K 6000K 6days 6 0 0

Will configure grace period for the user quota. Once grace period has been reached than the soft limit will be come hard limit.

Command to create grace period:

[root@server ~]# edquota -t

Grace period before enforcing soft limits for users:
Time units may be: days, hours, minutes, or seconds
 Filesystem Block grace period Inode grace period
 /dev/mapper/rootvg-lv_tmp1 7days 7days

Grace period also has two types which based on blocks and inodes.


Thanks for reading this post.